Home › Forum › Ask A Member › 1955 Evinrude 25hp Big Twin No Start
- This topic has 30 replies, 14 voices, and was last updated 7 years, 9 months ago by
gameroomfan.
-
AuthorPosts
-
May 11, 2018 at 11:41 pm #75812
before you rip it up why not try some pb blaster ATF oil seafoam or what ever in the cyl to see if the rings can loosen up
before you sink to much money in this get some compression no sense fixing a bucket if the bottom is full of holes
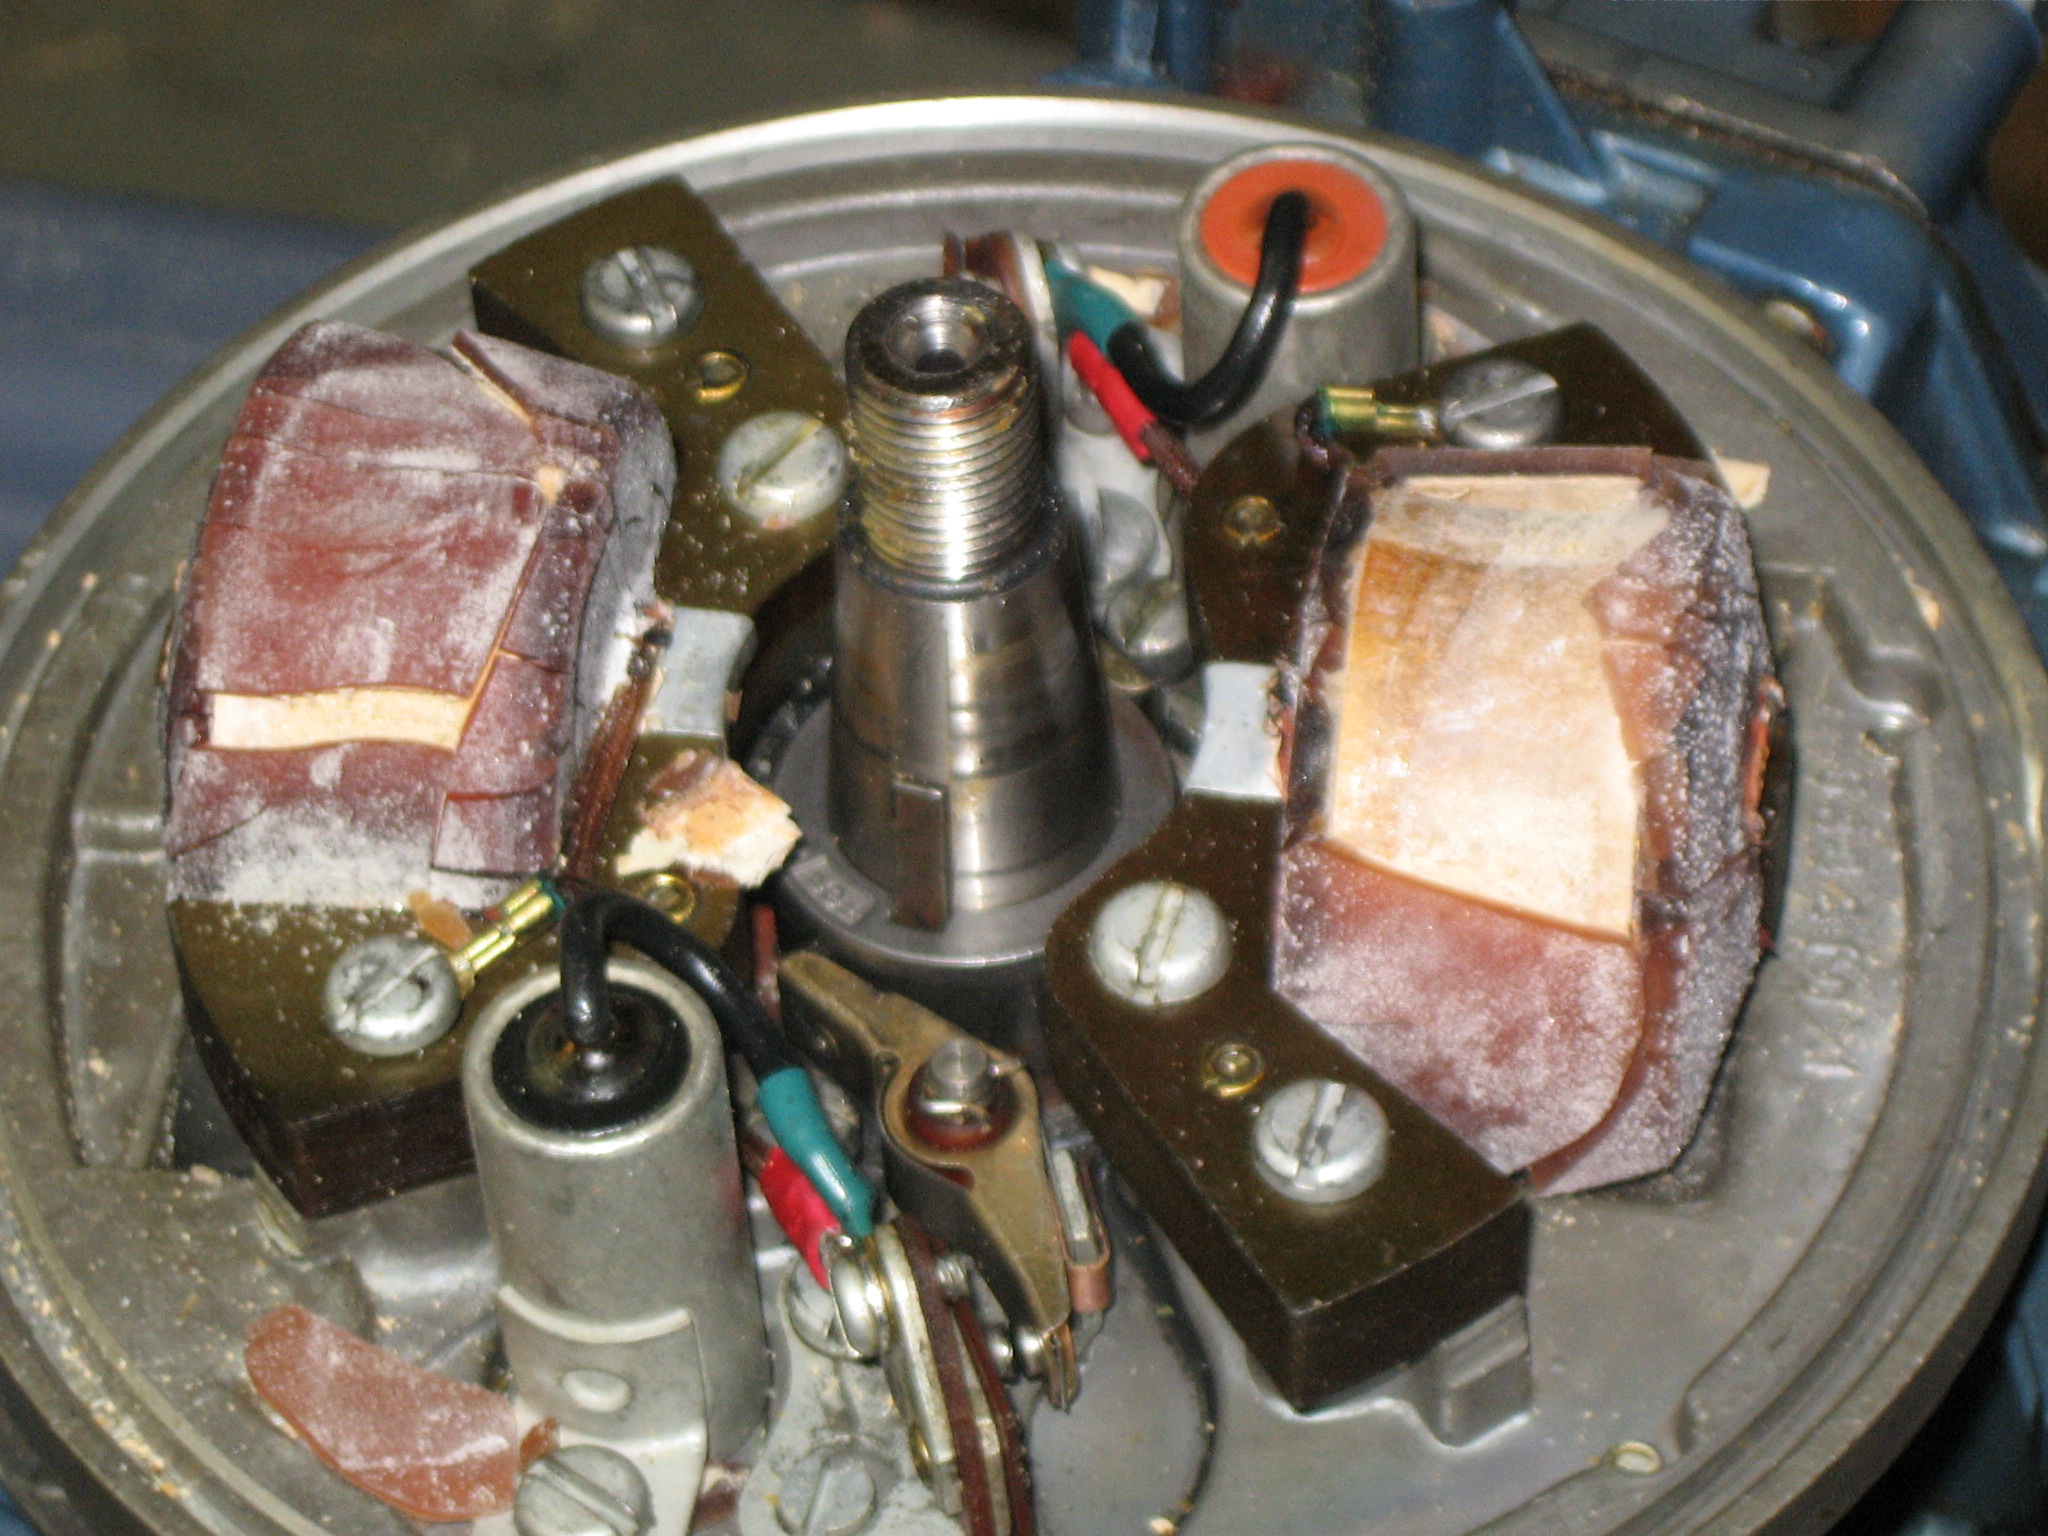
your coils may look like these
Attachments:
Joining AOMCI has priviledges 🙂
May 12, 2018 at 1:46 pm #75834Yeah, I would be concerned about those low compression numbers, would try a different gage just to ensure you are getting accurate readings.
Are you sure you have the plug wires on correctly? Popping through the exhaust often means the plug wires are backwards….
I don’t know if this engine has an access cover on the flywheel, if it does you can have a peek at the coils to see if they are messed up…
You mentioned fuel spilling from the front of the carb, make sure it is not flooding over causing a no start condition…May 12, 2018 at 2:58 pm #75842Backfiring in the exhaust often means crossed plug wires, but it also often means there is a spark problem (like cracked coils). You choke it and crank it and keep trying with more cranking and choking. All the while you are discharging fuel mix into the exhaust housing. Then along comes a chance firing which ignites that fuel in the exhaust housing, and BAM. Back in the day, we did the same thing with our cars. Switch off the ignition while going down the road, filling the muffler with gas, then switch the ign back on and BAM. Kinda rough on mufflers which only lasted a year anyway, back then. ("They don’t make them like they used to") That’s a good thing.
Still waiting for the serial number!!! It is important.
May 12, 2018 at 4:23 pm #75845Frank, what was the issue with these engines?
May 12, 2018 at 4:35 pm #75847Lower Crank Seal Assembly
May 12, 2018 at 9:09 pm #75855Oh OK, this is one of the one’s with the cheesy conventional lower seal that failed instead of the conventional carbon seal set up….
May 13, 2018 at 1:49 am #75870As F. Robb, Chris_P and others on this topic showed me, the seal can be changed to a carbon seal type or a better lip seal can be installed. Done it a couple of times. It does require opening the crankcase. Can do this later after the compression problem is addressed. 😀
June 22, 2018 at 11:13 pm #78297Hello gain guys. First of all, let me apologize for the delay in getting back to you with a report. Death in the family, and other life issues, not to mention other projects and actual fly fishing got in the way. I just spent 2 days digging further, and the results are below, along with follow ups to the suggestions previously posted:
Coils – pulled the flywheel and they look to be fine. Looks like someone recently replaced them
https://photos.google.com/search/_tra_/ … uN8ecXp8Hi
https://photos.google.com/search/_tra_/ … ad_p5BOhdpNeedle Packing Gaskets- replaced gaskets, 3 per needle. This solved the gas leakage from the needle seat/packing area I was seeing previously
Fuel Filter – gas is getting to the carb… I know, because gas was leaking profusely from the carb lower needle (see above)
Compression – forgot to double check before I began dissassembly. I realize this could be the root cause. But wanted to see what else was wrong before I attempted another start. I will say the fly wheel has pretty good "snap over" just from feel. Will test again once I have the other issues sorted (see below)
Magnet Check – magnet pulls on a screw driver pretty well. Same force as a Gale 25 hp magnet I have from another refurb project
Serial # is: 14252
Additional issues discovered:
Leaking upper crankshaft seal – Pulled the old one, and replaced with OEM
https://photos.google.com/search/_tra_/ … jsaVoJ9S7B
https://photos.google.com/search/_tra_/ … 8rwicm-ndX
https://photos.google.com/photo/AF1QipN … njhFL-mQzeCracked flywheel – not sure what to do about this one. Looks like some sort of metal fatigue. I have visions of the flywheel disintigrating at full throttle. Thoughts?
https://photos.google.com/search/_tra_/ … GF-pLyq2cVSet the timing – I bought the timing fixture from Richard (a great tool). Wasn’t sure what the throttle control cam position should be when setting points. I looked closer, and noticed what from my auto experience appeared to be a timing mark. So I set the points at that throttle position. Is this correct? See pic.
https://photos.google.com/photo/AF1QipO … HnzhSog3DoFriction between flywheel & armarture plate – this is a strange one. When rotated, the flywheel ‘grabs’ the plate, so that the plate at times rotates several degrees along with the flywheel. Not good, and maybe a no start contributor. I inspected closely, and gently ground off some burrs and uneven spots (Dremel) , etc both from the fly wheel and mating surfaces of the plate. Still grabbing. I then tried the Gale flywheel, and its grabbing too. Anyone seen this before? I will double check coil laminate alignment, but I think those are good, as I used Richards alignment ring for this and visually they are even with the plate bosses.
Last, Vacuum cut off swith wiring – I found the wire was loose and not connected. From my experience with the Gale magneto, this wire is routed up through the bottom of the armature plate, and connects to the insulated side of one set of points. I assume the vacuum swith grounds the points to shut off the motor. The Evinrude arm plate is a slightly different design, with no hole in the bottom of the plate, or routing clues. I wound up shearing the wire off while rotating the flywheel for setting the points because of misrouting. Interested in how this wire should be routed for the Evinrude.
https://photos.google.com/photo/AF1QipM … exTu_JiSyIWell, thats it for now. I will attempt to be more prompt in my followups, but life does go on. I would like to get this thing running (pricing new 25 hp motors does provide some incentive)<smile>.
alex
June 22, 2018 at 11:19 pm #78298None of your links are working for me.
Prepare to be boarded!
June 22, 2018 at 11:27 pm #78300Darn it. Ok, thanks for letting me know. Let me see if I can attach pics directly
-
AuthorPosts
- You must be logged in to reply to this topic.