Home › Forum › Ask A Member › 1959 35 HP Lark Shift Rod Bushing removal
- This topic has 7 replies, 6 voices, and was last updated 3 months, 3 weeks ago by
outbdnut2.
-
AuthorPosts
-
October 17, 2025 at 8:00 pm #300709
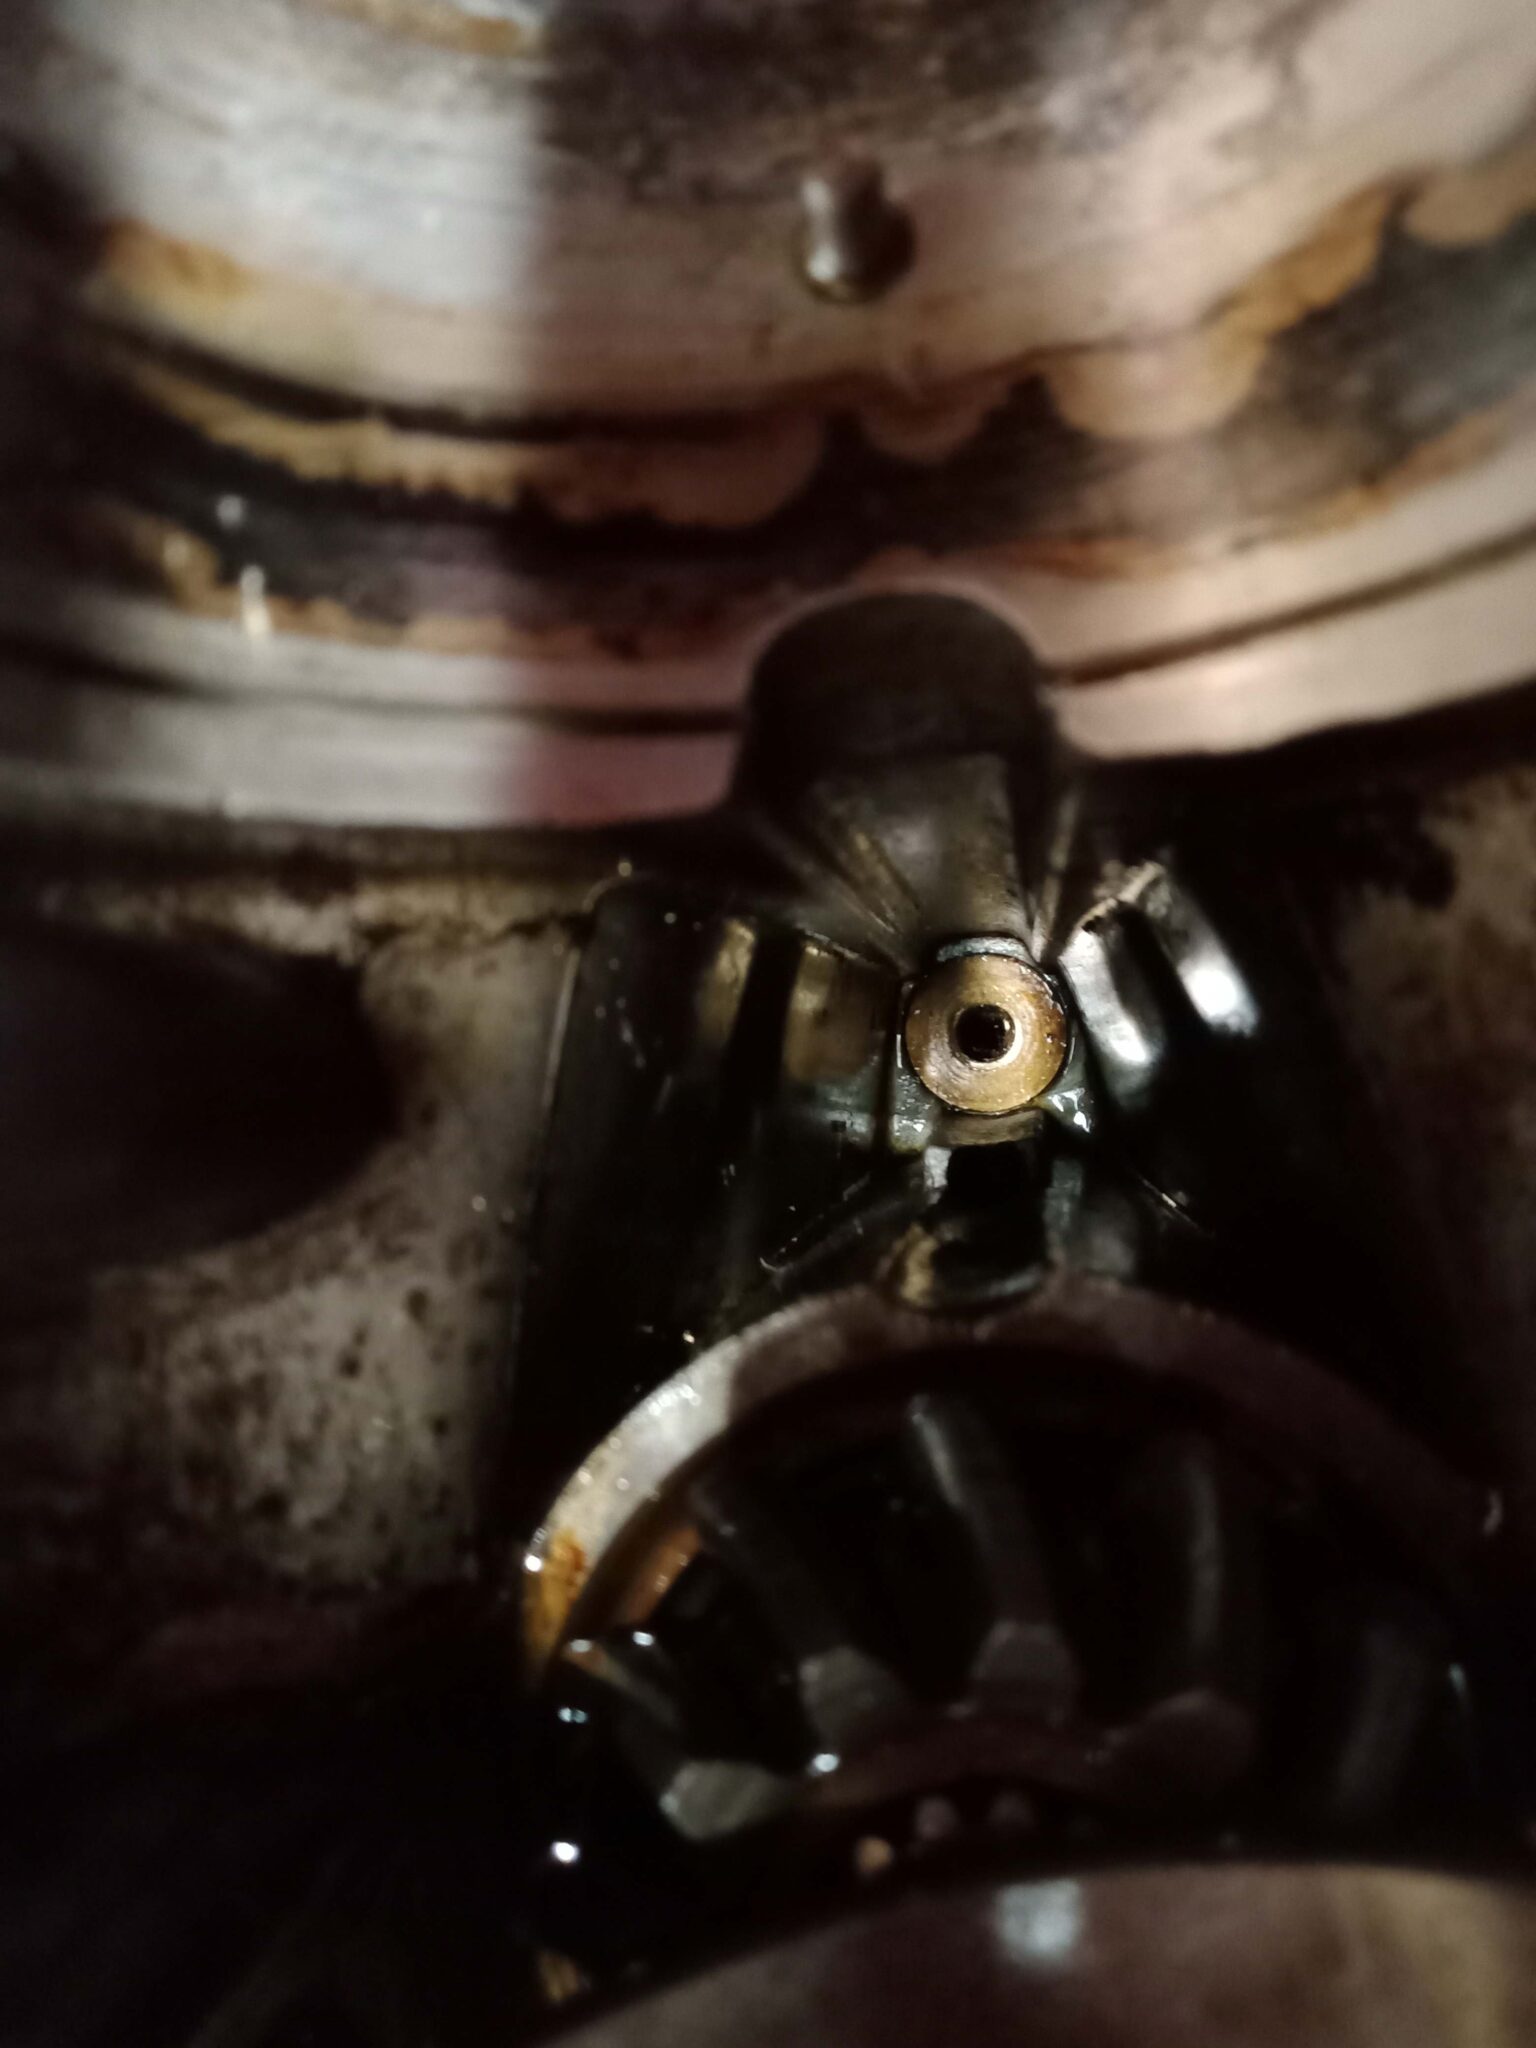
I’m putting a gearcase seal kit in a 1959 35 HP Evinrude Lark – (The early Super-Quiet). I’ve done seal kits before, but haven’t run into one this stubborn for removing that brass shift rod bushing to replace that O-ring. I don’t have the OMC tool, but, as I’ve done on others, I ran a good quality 5/16 x 18 tap through the bushing, and put a long bolt through it from the bottom side. I tried prying the bolt up with a forked pry-bar and stopped short of damaging the surface I was prying against. Next I ran a 5 inch bolt into the bushing from the top side and attempted to drive it out by putting a socket wrench over the bolt head and hitting it with a small sledge hammer. The bushing has not moved, but the bolt started to bend slightly.
Suggestions? Should I try heat? I have propane and MAPP gas torches, but it seems that it would be like trying to heat up a big heat-sink to get that area warm enough to expand. Or should I get a bolt long enough to pull out the bushing by putting the bolt through a board or heavy metal piece that can rest on the bottom of that gearcase housing for the bolt to pull against as I tighten it, hopefully pulling the bushing out?
There is nothing in the way of the bushing – photo below.
Thx,
Dave
 October 18, 2025 at 12:00 am #300717
I used a 5/16″ Starrett punch to knock out the bushing on my ’56 30hp and a couple other motors before I finally bought the OMC tool. A length of 5/16″ steel rod would also work. And yes, a little heat won’t hurt.
Bob
1937 Champion D2C Deluxe Lite Twin
1954 Johnson CD-11
1955 Johnson QD-16
1957 Evinrude Fastwin 18
1957 Evinrude 3022
1958 Johnson QD-19
1958 Johnson FD-12
1959 Johnson QD-20“Every 20 minute job is only a broken bolt away from a 3-day project.”
"Every time you remove a broken or seized bolt an angel gets his wings."October 18, 2025 at 6:32 am #300719I would use this method-but buy a piece of all thread instead of bolt. Also use heat before you do it.
” should I get a bolt long enough to pull out the bushing by putting the bolt through a board or heavy metal piece that can rest on the bottom of that gearcase housing for the bolt to pull against as I tighten it, hopefully pulling the bushing out?”October 18, 2025 at 8:54 am #300720I can only surmise you threaded it all the way thru. Regardless, my suggestion would be to use a piece of all thread and make a slide hammer…. thread so you have a good engagement into the bushing, then slide a piece of steel with an appropriate sized hole onto the all thread and then place a nut up top… Bang bang a few times and you should be in business… Try to keep the rod straight, as one “might” be able to waller out the hole..
http://www.richardsoutboardtools.com
classicomctools@gmail.comOctober 18, 2025 at 9:50 am #300724And don’t forget to replace that shift rod bushing once it is out as well, don’t reuse it after putting threads in it…. Your removal technique seems solid enough, am surprised it is putting up such a fight….
October 20, 2025 at 10:05 pm #300807When I had my 54 Evinrude 15hp I tapped the retaining block, 5/16″ to remove. after replacing the o ring lubed with petrolium jelly (inert grease) i installed the shift shaft while loose, then tapped the retaining block down until the o ring was compressed just righr to seal without forcing the shift shaft thru the o ring. Everything was lubed & had good sealing pressure without forcing the shaft thru the o ring.
October 21, 2025 at 12:05 pm #300817Thanks for all the suggestions. I now have some threaded rod I can try with some heat.
Posts about using a punch or 5/16 rod got me to thinking – I have a 5/16th “roll pin” punch that is a smooth shaft with a very small rim around a somewhat radiused tip, made for self-centering on a roll pin and driving it out. I have another similar scrap gearcase housing with a bushing that I will try that out on first. I’m wondering on my problem housing, if it’s Ok to try a 5/16 rod or punch on at after it’s already been tapped to 5/16×18? Will I risk just bashing through the threads?….or if I do that, maybe I should have threaded rod in it from the other side, almost all the way through to guard against clearing out the threads?
Dave
October 24, 2025 at 11:50 am #300890OK – I tried the 5/16 roll-pin removal punch to get that bushing out on both a scrap housing and on the stuck Bushing in the ’59 35 HP Lark housing and it worked great on both! At first, as the punch went through the aluminum hole above the brass bushing, I had to give it a couple very small taps, as it appeared to be a very slight interference fit in the aluminum. Then, hitting a bit harder each time with my short-handled, 5 pound sledge, without a whole lot of effort, Both bushings easily punched out. The one I had tapped, I put threaded rod in from the underside far enough to just meet the punch at the top of the hole in the bushing , as I wasn’t sure if the punch might just wipe out (strip) the threads instead of pushing out the bushing. I got the roll-pin punch set at Home Depot a few months ago to use on my snowblower, and now highly recommend it for driving out the shift rod bushing! The one in the scrap housing had not been tapped, so that will go into the Lark housing with the new O-ring.
To follow up on another post I made about the same motor (swapping the ’59 35 Lark Gearcase onto a ’65 40 HP) Yes – the 1974 Johnson parts swapping book was correct, as the assembled gearcases swap, but had to reuse the 1965 water pump and driveshaft, as thje lark driveshaft had a pin to turn the impeller and the ’65 40 HP had a Woodruff key.
FYI: On this gearcase swap, I found that the gearcase on the 40 HP had a major disintegration of parts (bearings and washers) around the crankshaft below the water pump. The driveshaft was quite galled-up for 4 or 5 inches below the water pump. Someone had taken it apart and cleaned out all the broken, ground up pieces (washers, bearings, etc), and put it back together using the galled up driveshaft, leaving ground up parts out, not replacing them! The center hole in the impeller plate was ground up to about 1/8 inch larger all the way around, as was the metal on the seal below it. The strap with two screws that goes over the bottom of the pinion gear to hold it in place was also missing; and two small holes were drilled in the shift dog fork, with a piece of thin, steel wire put through those holes and around the shift dog, then twisted together, probably to hold the fork on the shift dog parts during reassembly; so good thing I had the gearcase from the 35 Lark. I can’t imagine who would put this thing back together like that with a total of 8 parts missing, and install the gearcase back on the motor! The parts swap manual said the 35 Lark gearcase would swap onto the 40 except for water pump and driveshaft, and it was correct. The 40 had a long driveshaft and the 35 had a short, so had to find another long driveshaft. I had one possibility – a 1969 40 long shaft with electric shift parts motor. The parts swap manual didn’t show the electric shift model as a driveshaft swap, but I looked up the driveshaft part numbers and they were the same, so got the shaft out of it, and yes – it was the same. Now to put in the seal kit and reassemble. I will use the propshaft and gear assembly from the 35 , as the bearings in the one from the 40 are likely damaged from all the ground up parts. The long shift rod from the 40 was not damaged – wo will reuse it in place of the short rod that was in the 35.
Word is the boat sat in a field for 9 years, and the guy I’m fixing it for was given the boat and motor free from a friend.
Dave
Here’s a link to the roll pin punch set I got at Home Depot: -
AuthorPosts
- You must be logged in to reply to this topic.