Home › Forum › Ask A Member › Gale Buccaneer 3D11B Ignition Issues
- This topic has 8 replies, 4 voices, and was last updated 9 years, 7 months ago by
 frankr.
-
AuthorPosts
-
June 18, 2016 at 4:20 pm #4530
I am in the process of restoring my Gale Products 3HP Buccaneer Model 3D11B. It is the first motor I have ever worked on. I have read Wawrzyniak’s Cheap Outboards.
Replaced the entire ignition system (coil, condenser, points, spark plug lead, & spark plug), but I have no spark.
Tried the old spark plug to determine if the new one was defective, but the old one didn’t throw a spark either. Plugs are properly gapped.
Tested the resistance of the spark plug lead (OMC OEM 0580146) and it has low resistance (3 Ohms). Inspected the connection between the spark plug lead and the coil post and it is definitely making contact.
The magnet on the flywheel is strong.
Points are properly installed and gapped, and are opening and closing normally.
I am left with the possibility that the new Sierra coil (18-5181) or the Sierra condenser (18-5199) is defective.
Can someone tell me if I can test the coil and the condenser with a multi-meter and what is the procedure?
My next step would be to purchase an OMC coil & condenser and forget about saving a few dollars with Sierra electrical components.
June 18, 2016 at 6:09 pm #38524Can we assume the resistance of the spark plug lead included the coil’s secondary winding and the result was 3K-ohms, not 3 ohms? If I’m assuming correctly, that sounds about right.
Clean the breaker points. Yeah, I know, you said they are new. But even new ones develop an invisible non-conductive coating on the contact faces.
June 18, 2016 at 8:51 pm #38530DRD, The 3D11B Buccaneer was my first outboard. It was my
grandfather’s, and I used it all the time in the 70’s when
I was in my teens. Great little outboard. I took it down from
the rafters last year, fired it up, and ran it in the barrel.
The coil insulation was all cracked up, but it still ran decent.This site shows how to test coils….
http://www.pochefamily.org/outboard/coils.htm
Good Luck!Prepare to be boarded!
June 19, 2016 at 4:29 am #38571Compression = what is your compression value?
Spark = you need to check spark. (you should be able to jump gap of at least 1/4 inch)
Fuel delivery = carburetor cleaned properly and correct settings.Here is a bunch of information that you can read and do the repairs yourself and know what is going on.
Here is some information that will help you evaluate your ignition system with the flywheel popped off.
If you don’t have a harmonic balance flywheel puller, you can make a flywheel knocker tool. One of our many distinguished member put this tutorial together on how use and make a flywheel knocker to safely remove a flywheel. I have tried and it workings well. I have both the flywheel knocker and harmonic balance flywheel remover.
Your going to need to inspect your point, condenser and coils. They are located under the flywheel. Hopefully all you need to do is clean and regap your points and you might be in business. Still check your coils and condensers and plug wires.
Here are two link to show you how to test your coils and condensers.
http://www.youtube.com/watch?v=KT8rk5QWgS0
http://www.youtube.com/watch?v=l6eSXYmENDY
How to replace your coils, points and condenser. Please take digital pictures as you go, so it will help you return everything back in the right order. Keep cheap zip lock bags available to put your parts in so you don’t lose them. They are small.
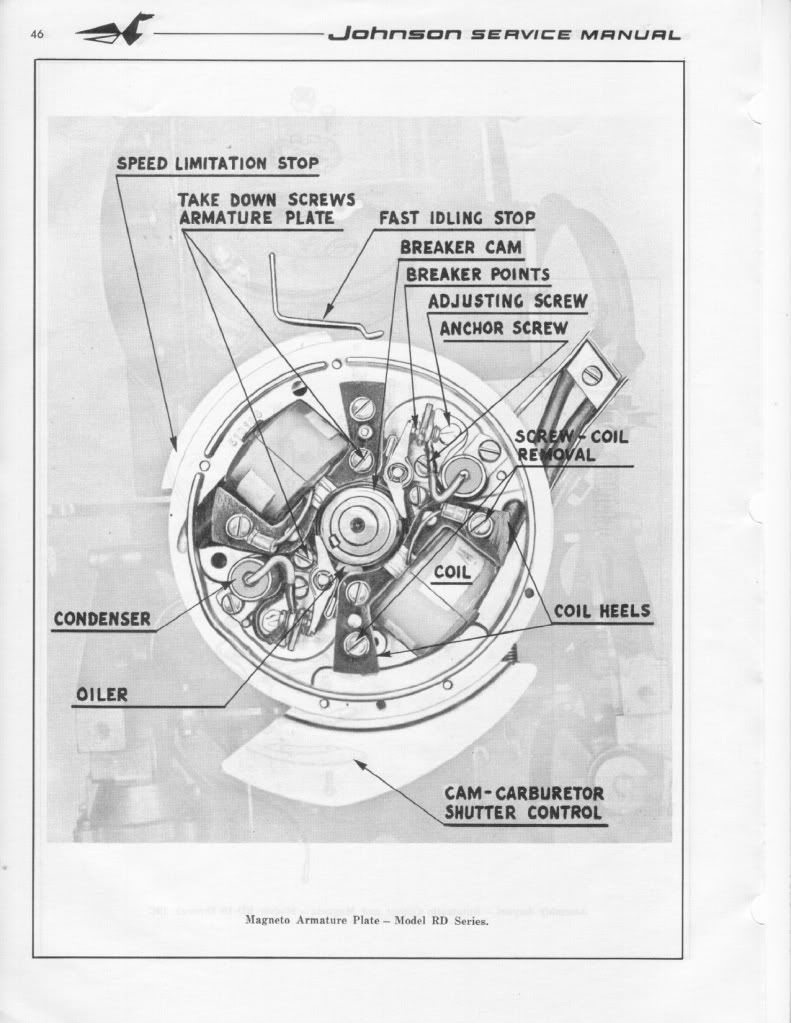
Here is a diagram of a generic OMC (Johnson/Evinrudle/Gale) ignition assembly. You will have to remove the coil designated for the top cylinder and put the oil wicker in. It should be already be coated with a very light oil. (not grease). The purpose of the oil wicker is to lightly lubricate the outside riding surface of the cam so the point shoes do not prematurely wear. If you look at the points they have little shoes that ride along the cam. Please make sure the (breaker)points cam is on the correct side or the ignition will be out of timing. It should have the word top machine written on the side facing up.
FYI: You can only set(gap) one set of points at a time. Put the flywheel nut back on(turn with a wrench or ratchet clockwise) to allow you turn the crankshaft. (Please remove both spark plugs to make it easier to turn the crankshaft and prevent accidental starting)
You gap the point to 0.020 when the point shoes is at the top(high point of the cam). It should have a mark along with the word top. Then you will turn clockwise to the next set of point 180 degrees and set those points the same way. You will notice that the point of the previous set will be closed and when you come around again they will open up. *** When they are open no current is allow through. This is how you set your timing with the points.***
When you go to set the point’s gap. Very gently snug the anchor screw, then adjust the gap with adjusting screw and the feeler gauge until the feeler gauge is sliding through with slight resistance only. Then tighten the anchor screw. Repeat procedure with second set of points. Please make sure your hands are clean and the feeler gauge is clean, because oil on the points can foul them up and create resistance….poor or no no spark. ALways use a spark check to evaluate spark. It should jump minimum 1/4 inch. Blue sharp snappy spark.
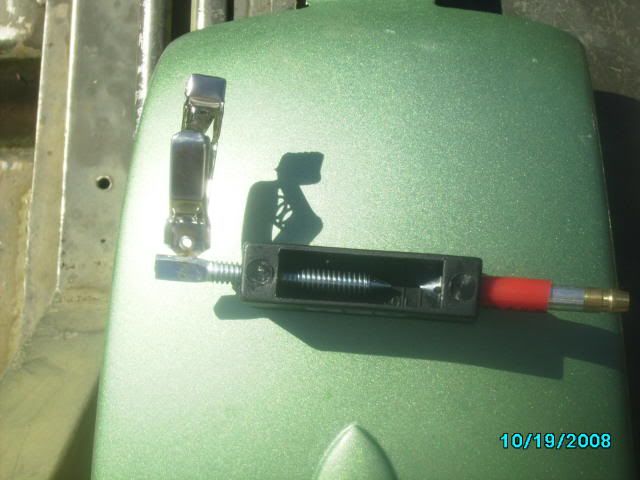
Here is a picture of a spark check…Cheap $6
Here is a picture of how to tell which wire is going to the correct cylinder. Thanks to Garry for providing the picture on other post.
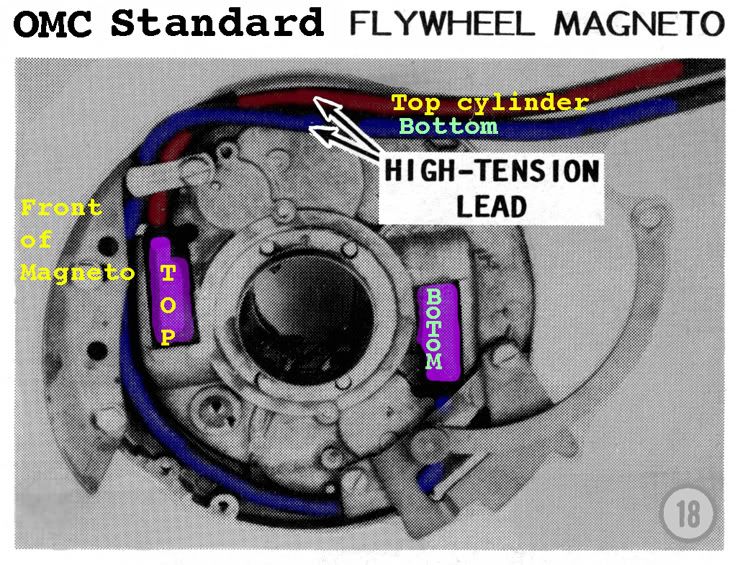
If your using the existing wires then cut about 1/4 inch of end going the coil, so you have clean un-oxidized copper contacting the spiking in the coil. Twist the end of the spark plug wire onto the coil spike. If you have replaced the wires, make sure they are 7mm copper metal core and not the automobile stuff.
***** Please make sure two things*****
1.) Make sure all the wires are tucked away under the flywheel and not rubbing up against the cam or crank, because with will eventually get damage and create a short, then no spark!!
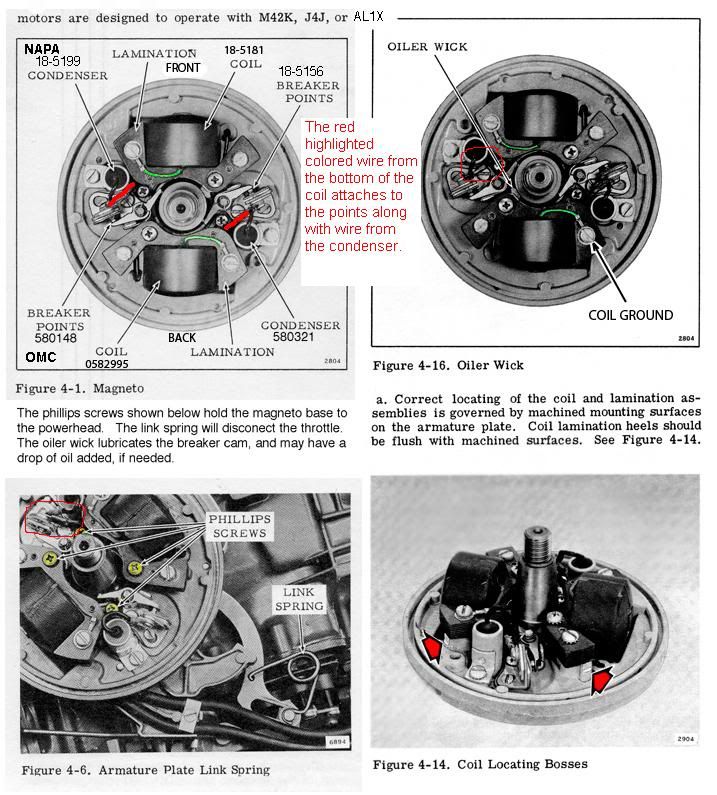
2.) Make sure the coil heels (ends) are evenly lined up with the mounting boss.
Here are some pictures. (Compliments of JBJennings..nice fella)


Lining up the coil heel with the mounting boss prevent damage of the coils and the flywheel magnet, prevent rubbing as the flywheel turns.
*** Make sure the throttle is advanced to that start position***
Here is another picture that Garry (thanks Garry!!) supplied on another post with some modification.
Both diagrams, should answer your questions.
Here is some you tube videos that can help you diagnosis and properly setting your ignition and clean set your carburetor
Here a bunch of videos that can help you along. They are long and detail, but I purposely made them that way, so someone new to motors would feel comfortable. So, I apologize if they are boring. I originally made those videos to help a guy who had little mechanic knowledge.
Here is a link on how to remove a flywheel.
https://www.youtube.com/watch?v=Nz1st4XnsX4
Here is a bunch of links to evaluate and repair your ignition
If your looking for a help cleaning your points and testing your ignition, then here are some YouTube videos that can help.
Not professional videos, but they can help guide you through ignition diagnostics and repair. The motor in the video is a 1968 Johnson 6hp.
Hopefully will give you a visual and help you some.
Evinrude Gale and Johnson ignition video 1
https://www.youtube.com/watch?v=oTN8Ag_aj-8
Evinrude Gale and Johnson ignition video 2
https://www.youtube.com/watch?v=r7A6d8me0Gw
Evinrude Gale and Johnson ignition video 3
https://www.youtube.com/watch?v=ZAlT32NnTJ0
Evinrude Gale and Johnson ignition video 4
https://www.youtube.com/watch?v=re6FgcB_Yok
Evinrude Gale and Johnson ignition video 5
https://www.youtube.com/watch?v=ClGt6xHnb94
Evinrude Gale and Johnson ignition video 6
https://www.youtube.com/watch?v=taaSzp1Ev-0
Evinrude Gale and Johnson ignition video 7
June 21, 2016 at 8:16 pm #38717quote FrankR:Can we assume the resistance of the spark plug lead included the coil’s secondary winding and the result was 3K-ohms, not 3 ohms? If I’m assuming correctly, that sounds about right.Clean the breaker points. Yeah, I know, you said they are new. But even new ones develop an invisible non-conductive coating on the contact faces.
I did not notice that the top of the Ohm scale on the multi-meter read 1K. Also, the meter was not zeroed. Resistance of the spark plug lead is right at 1.2K Ohms.
I did clean the points, and that did not help.
Thanks for your reply.
June 21, 2016 at 8:20 pm #38718quote Buccaneer:DRD, The 3D11B Buccaneer was my first outboard. It was my
grandfather’s, and I used it all the time in the 70’s when
I was in my teens. Great little outboard. I took it down from
the rafters last year, fired it up, and ran it in the barrel.
The coil insulation was all cracked up, but it still ran decent.This site shows how to test coils….
http://www.pochefamily.org/outboard/coils.htm
Good Luck!My Buccaneer was also my grandfather’s, then my father’s, and now mine. My father retired it in about 1980 when he could not acquire a new water pump. That was the first thing I replaced. Then I rebuilt the carb, and replaced the ignition system.
June 21, 2016 at 8:43 pm #38719quote cajuncook1:Compression = what is your compression value?
Spark = you need to check spark. (you should be able to jump gap of at least 1/4 inch)
Fuel delivery = carburetor cleaned properly and correct settings.
Compression is 35 psi. I could find no compression spec in the Gale Products Service Manual (2nd Edition), so I am not sure if this is unacceptably low.
I disassembled, cleaned and rebuilt the carb. Needle valve set between a1/2 turn per the Gale Service Manual and the 3/4 turn per Wawrzyniak in Cheap Outboards.
I do get a low voltage from a pull on the starter (peak of 4V) I do not see a spark across the electrodes with the plug out of the motor and the threaded portion grounded.
I still think my issue is component failure of the coil or the condenser, or maybe the magnet in the flywheel.
I did not think getting this very simple motor running again would be this difficult.
I am somewhat discouraged, but haven’t conceded defeat yet. If I buy an OMC coil and condenser and that does not still fix the problem, I think I will have put enough money in parts and sweat equity into the old Buccaneer.
June 21, 2016 at 8:48 pm #38720And thank you to everyone who replied.
June 21, 2016 at 9:08 pm #38723DRD, you said you replaced the entire ignition system, but still have no spark. You also said you only have 35 psi compression. That is way too low so you need to decide where you are going with this thing. However, the low compression has nothing at all to do with no spark. UNLESS the upper main bearing is worn way sloppy loose. That would affect both coil to magnet clearance and breaker points gap/timing. Magnets never go bad, so it isn’t that.
So..summing up, decide what you are going to do about the compression. As for the spark, double check your work. Barring some major problem, it should spark if you did everything correctly. BTW, check the resistance across the points with meter on lowest OHMS range. Should be zero Ohms when points are closed and about an OHM when they are open (the resistance of the coil primary winding).
EDIT: I may have misled you there. Many meters cannot tell the difference between zero Ohms and one Ohm. In that case, disconnect the wires from the points before checking resistance across them. Should be zero (closed) and infinity (open).
If you want to scrap that motor, just drive by my house about midnight and toss it out in my front yard. (I collect them).
-
AuthorPosts
- You must be logged in to reply to this topic.