Home › Forum › Ask A Member › Power Head Cross Reference for 1958 Evinrude Fisherman 5516
- This topic has 59 replies, 15 voices, and was last updated 3 years, 11 months ago by
 Buccaneer.
-
AuthorPosts
-
March 27, 2022 at 5:36 pm #256945
OK, I just saw the pictures, didn’t see them when I first responded. So review again just what was making the engine difficult to pull over… Were the pistons rusted to the cylinder walls, stuck rings? Quite honestly, I don’t see that much damage on the rod bearings that would cause the engine to bind up as you describe. Keep in mind that this is no chevy small block V8, it will run just fine with many imperfections. I wouldn’t worry about the wear to the lower crank journal. Was there slop in the rods? I’m thinking that most engines of this type when pulled down will show some wear to the rod bearings. Like Frank says, I’m thinking that crank will clean up OK, but you do want to measure the journals after you clean it up. Now that it is apart, you should replace the rods. The wrist pins fit tight on one side of the piston bores, the loose side has an “L” stamped into the casting below its piston bore. I know it seems counter intuitive, but the wrist pins should be pressed out from the loose side through the tight side, then reassembled the same way, from the loose side pressed into the tight side. A decent pressing cradle can be made by cutting the appropriate size hole/piston diameter through a 2×4 so the piston skirt is properly supported while pressing the wrist pins out then back in. Not taking care while changing the rods could distort the piston skirts. I guess you should begin by honing the cylinders lightly then checking ring end gaps in a few areas of each cylinder before spending money on new rods. You have already come this far with its original powerhead, so I would rebuild what you have if you feel capable. Once again, chances are pretty good that a used powerhead will have some wear on the rods…
After rebuilding it is so important to adhere to the factory recommended oiling ratio of 16:1, ignore all the hype about today’s improved oils allowing less oil to be used. These engines hardly smoke at all, even at 16:1. Cutting back on the oil is the best way to damage the rod bearings on this engine, along with improperly an assembled lower seal assembly.
Before you get too deep into this project, is the gearcase in good shape? Was the oil clean and free of water when you drained it? If not, plan on pulling the gearcase apart as well to inspect and reseal it. It will surely need a new water pump impeller if that has not been replaced already.
March 27, 2022 at 8:00 pm #256955Difficulty in pulling the engine over:
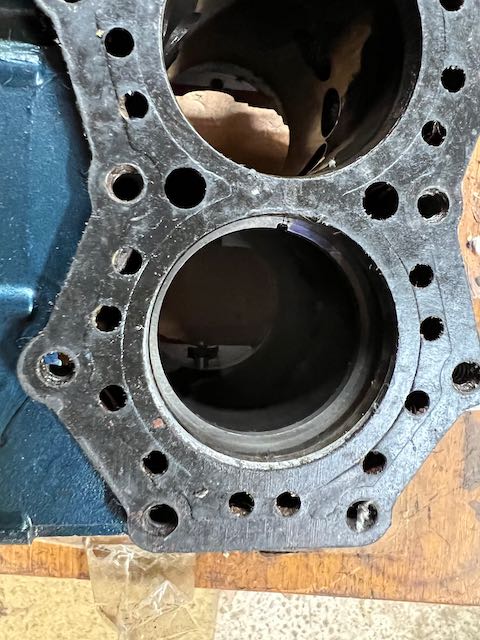
- the pistons are still in cylinders, I have not yet removed them from the crankcase. I can move each piston up and down by hand, plus I can see much of the pistons, rings and cylinder walls through the exhaust port. No rust, smooth cylinder walls (no scratches) and dull gray color on the rings.
- the connecting rod bushings are silver colored and not bronzed.
- the other night I reassembled the power head on the workbench (when not concerned about new gaskets and proper torquing it only took about 10 minutes), put the flywheel nut on the top with the flywheel and turned the crank, it was still hard to turn with a breaker bar. I thought it would just spin around easily (no plugs, minimal assembly tightening), it did not.
Replacing the connecting rods:
- Ed Elliott contacted me this afternoon with NOS connecting rods.
Crankshaft:
- Will clean up the crankshaft tomorrow with fine grit sandpaper and spec it out. If it fails there are a couple online.
Removing connecting rod and checking pistons:
- Reviewed the Johnson service manual and will make a cradle out of wood as you suggest. This should de-risk that procedure so I don’t damage the pistons.
- Will also check ring gap, really hoping I don’t need new rings, they are not a cheap date.
Running with oil: I have and will continue to run with 16:1 on my engines.
Lower unit
- in the PM I sent to FrankR I mentioned that it was a shame to tear the gear case apart, the fluid was clean, the gears were in very good shape but this is a new to me motor. I did replace the impeller, water pump housing, impeller housing plate, upper bearing oil seal, prop shaft oil seal then sealed and successfully pressure tested the unit. It rotates easily with no unusual effort.
- When I had the hard pulling trying to start it after completing the initial rebuild I was really hoping it was the shock absorber rubbing on the bearing carrier.
Cleaning the journals and crankshaft
- Other than fine grit sandpaper and maybe acetone, is there anything else to do to clean them up.
Thank you for you detailed reply, there were some issues with posting and maintaining the photos in the post.
March 28, 2022 at 12:19 am #256962Hey guys, while lying here awake tonight, a thought came to mind. I wonder if that motor came off the transom while running WOT and twisted the crankshaft. That would account for the tightness when bolted down, and maybe also for the water etching. I’ve seen some pretty spectacular damage to race engines that did that, (or the boat flipped). What do y’all think?
March 28, 2022 at 2:33 am #256963Crosbyman your 5and a half might seem to pull over because it has the older style rewind.I know that you know a lot about outboard motors but it is just a thought.
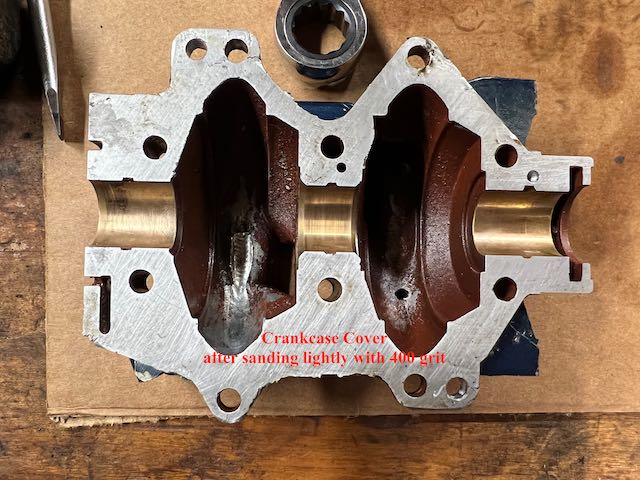
March 28, 2022 at 9:23 pm #257070Tonight I removed the pistons and cleaned up all the journals and crankshaft with 400 grit carborundum very carefully.
The attached video shows how the crankcase can be turned without the pistons. I also spun the crankshaft in the case without the top cover. It rotated smoothly with any wobble at all, so I believe the crankshaft is straight.
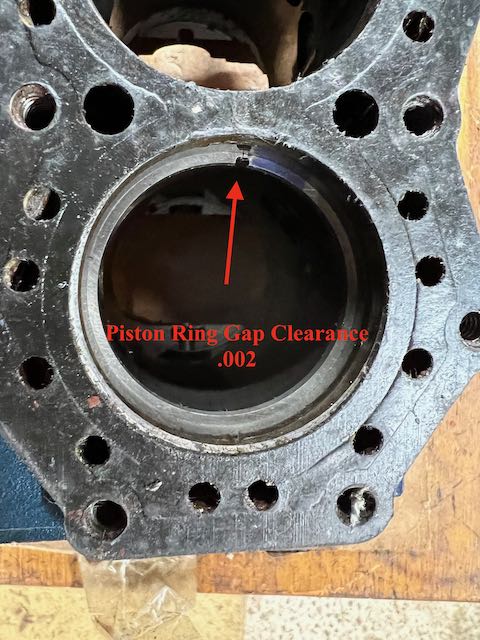
I removed the top 2 piston rings from each piston to measure the gaps, bottom had ~.002, top had ~.005. The.002 is too little, the .005 is on the bottom end of ok. I was expecting more ring gap. Before the pistons came out I could move them by hand when they were in the crankcase. If had to file the rings there is the gap, a lip and then the rest of the ring. Filing that lip would be difficult to do with my dremel tool and a rotary file. The lip is very thin and just touching it would remove the ring material very quickly. Filing it by hand would be risky as well.
The crankshaft bearing measurements are greater than spec. It was difficult to get measurements with my digital caliper, it was around 20 degrees in the garage. I was careful in polishing the crankshaft journals with the 400 grit. You can see they are not quite polished.
The cylinder walls were smooth top to bottom.
Please advise on where to go from here. Ed Elliott has new connecting rods and all the gaskets needed to put this back together.
Thank you for your patience and time.
-
This reply was modified 3 years, 12 months ago by
 AOMCI Webmaster.
-
This reply was modified 3 years, 12 months ago by
Mike Nazarenko.
March 28, 2022 at 10:50 pm #257080March 28, 2022 at 10:51 pm #257084Attached photos
March 29, 2022 at 10:22 am #257107OK, if the gear lube was relatively clean and impeller was replaced, then there is no need to disassemble the gearcase for sure.
Sounds like the powerhead is definitely stiff for some reason. Does it feel the same as it did before you disassembled it? You mentioned the pistons seem to move up and down easily and are not obviously damaged. Did it look as though the powerhead had been split apart before you disassembled it? We definitely need to sort out this issue before you spend anymore time and money to rebuild it. Frank has stayed awake thinking about this, so rest assured we will help you figure it out.
Let’s begin with some basic things, and please don’t be offended if I ask some obvious questions, we just have to start at the beginning. The connecting rod caps are unique to each individual rod, so the rods will definitely bind if the caps have been inadvertently swapped between the two rods. Furthermore, rod cap orientation is critical also, it will only fit properly when oriented correctly. There are line up marks on the caps and rods, but they are not that easy to see unfortunately. But, the rods will definitely bind if the caps are not oriented properly as well.
Frank mentioned a bent crank, surely possible. So, we need to isolate the rods from the crank, reassembled the crankcase halves, then spin it over again. Before we do that, I need to point out the two crankcase alignment taper/ dowel pins that help keep the crankcase halves aligned correctly. These pins should have been driven out (before loosening the crankcase screws, driven out from the cylinder side towards the intake side). During reassembly, the pins are reinstalled (from the intake side toward the cylinders once the main six crankcase screws have been lightly secured) before actually snugging up/torquing the screws. This ensures the two halves are properly aligned. It should also be mentioned that crankcase halves are unique pieces and can not be swapped between different powerheads, but this condition doesn’t seem likely here unless there was evidence the powerhead had been apart before you diassembled it .
So let’s do this slowly to help isolate the actual problem. I guess I would start by driving the taper pins back out then just loosening the crankcase screws slightly to see if the engine frees up. If it does, then this would indicate some sort of crankcase fit/alignment issue, or a possible bent crank. If rotation is still stiff, then I would suspect a problem with rod cap fit/orientation. Remove the front crankcase half, then try to rotate again. If it is still stiff, we will move on to the rods. First, check to see that the alignment marks on the rod halves are properly lined up. If not, well this issue will be resolved with new rods. If the alignment marks are properly oriented, then we will loosen one rod cap at a time and retest/rotate. Loosen one rod cap, then try to rotate again. If it frees up, then we have isolated that there is a fit issue. If it is still stiff, then try loosening the other rod, a fit issue should be suspected on that rod. Perhaps there is a fit issue on both rods. Again, there is no way of knowing if the rod caps have been swapped between rods, but you should be able to tell if cap orientation was messed up by looking at the line up marks and the two halves.
Finally, if nothing seems resolved by loosening the rod caps, then I would disconnect one rod at a time, push its piston out of the cylinder (please mark the pistons), then try to rotate. Then remove the other piston and try to rotate again. If nothing seems resolved, then we can suspect some sort of crank issue like Frank spoke of. If rotation frees up with either one/both of the rods separated from the crank, then there is a rod fit issue, or perhaps a bent rod or binding piston. At this point, I would reassemble the crankcase halves/taper pins with just the crank installed. Does it spin freely with the crankcase screws lightly snugged up? If so, try tightening/torquing them. A bent crank, or crankcase alignment issues should be suspected if rotating the crank is difficult with the crankcase screwed tightened up.
Sorry, I realize words can be confusing, feel free to ask questions for clarification. Nonetheless, we have to isolate the issue before you go ahead with this project.
March 29, 2022 at 11:03 am #257109Let me address your questions. Have only addressed the 1st group. Need to go back this afternoon to answer next few (isolating the connecting rod caps) to determine what is causing the binding:
- Doesn’t appear that the head was split before. No scratches on the crankcase paint.
- Removed the pistons last night and they are not damaged. Rings compressed into the slots made for them, move easily. Top piston had more carbon than the lower. Carefully removed the rings and placed them in the cylinders to measure the gap. The gaps were very tight, .002 and .005. Rings are solid, then a lip and then the gap. If these need filing, it will be easy to damage them.
- Connecting rod caps. Have been careful to take photos and not mix them up. The bottom connecting rod cap has a silvery appearance, top one not so much. Caps on both rods were facing the same direction, I could clearly read the part number on them.
- I reassembled the crankcase halves without the pistons. Crankshaft spun smoothly in the journals, no wobble. Using reasonable pressure on the screws to tighten. Was able to spin the crankcase pretty easily. YouTube video on that.
- https://youtu.be/jhQ1LlPwj0A
-
This reply was modified 3 years, 12 months ago by
March 29, 2022 at 11:11 am #257115Amen. Couldn’t have said it better.
-
AuthorPosts


- You must be logged in to reply to this topic.