Home › Forum › Ask A Member › Powerhead removal advice, ’79 OMC 9.9?
- This topic has 15 replies, 6 voices, and was last updated 10 years, 2 months ago by
Alan.
-
AuthorPosts
-
January 7, 2016 at 4:22 am #3341
Hello to all;
Got the six obvious bolts out holding the powerhead to the exhaust housing, but it doesn’t want to move. I didn’t push very hard, though.
I’ve never pulled the powerhead off of one of these, and will very much appreciate any tips or pointers. I tried, but couldn’t find any exploded drawings online, (Leeroy’s ramblings included. He has good general advice on the 9.9 / 15’s).
It’s been 8 or so years since the last impeller, and my non-expert exploration seems to indicate that the upper grommet is likely swollen. (It may not have been flushed very well, when it got its one week a year of salt use. But it was a gift, and seems to be a great little motor).
Edit:
Leeroysrambling.com does cover this.
"If after you have all the bolts loose if it will not budge, what is holding is probably the gasket between the powerhead and the midsection."
Leeroy says I need to hit it with a hammer, or pry on it. Does that sound right??
I’ll proceed with caution, and will still want to hear what anyone has to say.All advice and opinions welcome.
Thanks!
Alan
Member AOMCIJanuary 7, 2016 at 5:07 am #29730Can normally pop them loose with a long screwdriver or pry bar. Just be a bit careful where and what you pry against. The lower pan is a thin aluminum casting.
January 7, 2016 at 5:09 am #29732Hi Calan.
Leeroy may be partly right as a stuck crankcase head will also make them stubborn to remove. If it has seen salt, the tighter it will be so I do use a crowbar type tool to carefully pry around the edges of the block to crack it loose. The secret is to go around evenly and not pry too hard. Back and forth, back and forth. Once it breaks free, it will lift off quite easily.When putting it all back together, I like to coat the head with Triple Guard grease to make the job easier the next time it has to come apart.
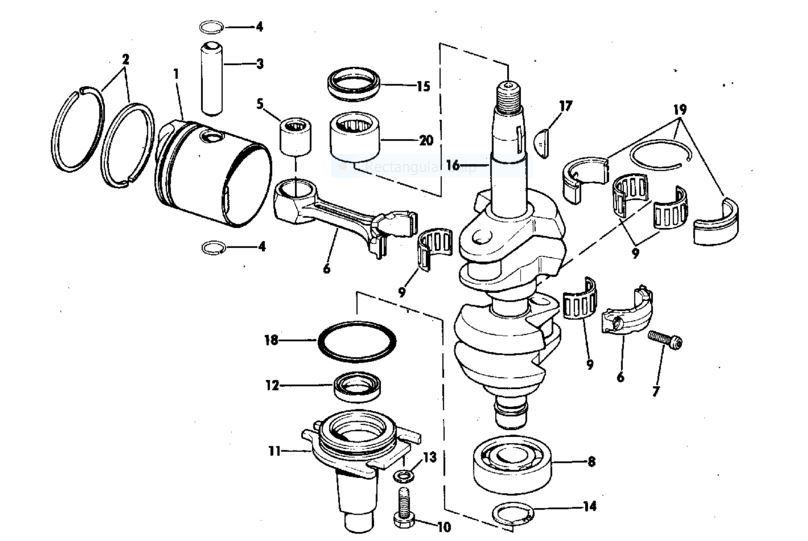
Here’s a 9.9/15 which had this problem. The shiny area is where the corrosion happens.
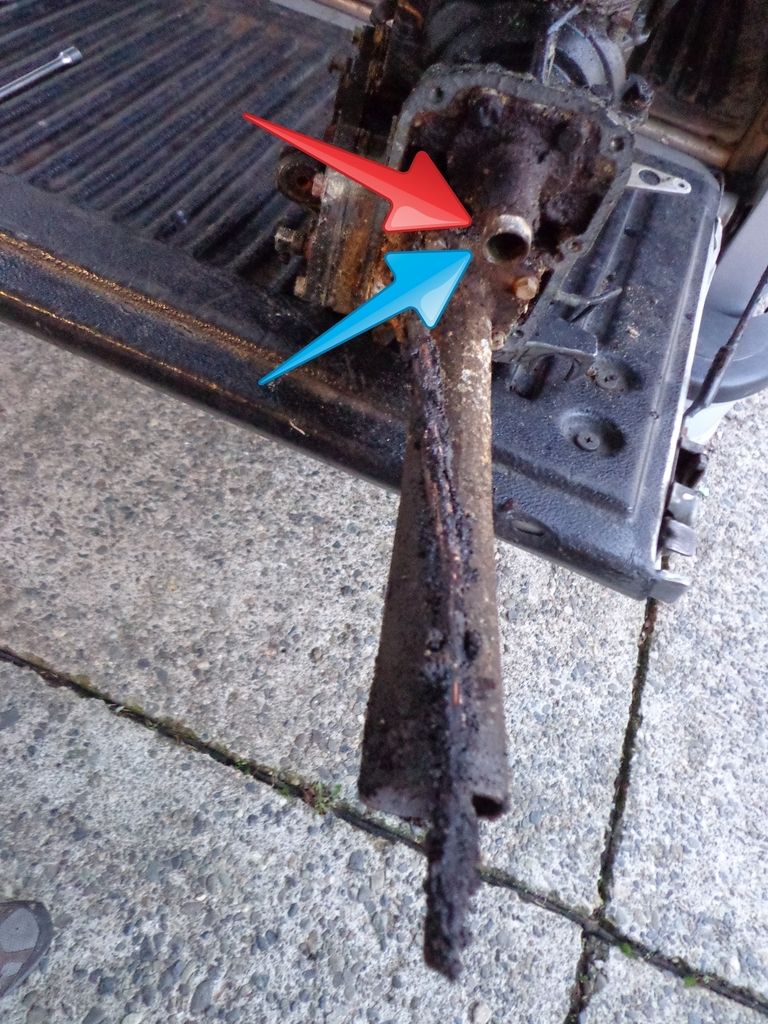
The head is #11 in this diagram.
 January 7, 2016 at 6:11 am #29738
Got it!
The crankcase head explains why it wasn’t coming apart like I thought it oughtta.
Upper tube grommet wasn’t horrible, but far from perfect.
Many thanks!
AlanJanuary 8, 2016 at 10:38 pm #29836Yeah, be real careful where you pry, sometimes prying on opposite sides at the same times helps also. The lower pan is easily broken, as is the cylinder head. It wouldn’t be too tough to bust the intake manifold when prying from the front as well.
Is this a fresh or salt water engine? I’m guessing fresh water if the grommet was in pretty good shape. Let me know if you are going to use it in salt water, I will show you how to install the grommet "improperly" to greatly reduce the collapsing problem. DJanuary 8, 2016 at 10:46 pm #29837What is "improperly", upside down?
January 9, 2016 at 4:05 pm #29890Not upside down. This engine uses the first change in the grommets, not likely that its water tube/grommet has been updated to the later style. Again, the first years of these engines did not really have grommet issues until the design was changed in the late 70s, I think 1979 was the first year for the misdesigned grommet.
In any event, there is a groove half way down the grommet that the water tube flange sets in. Installing the grommet "properly", allows the top half of the grommet to be unsupported internally by the water tube. When the grommet is not fully supported internally, salt build up between the exhaust housing and grommet easily crushes the top part of the grommet.
So, I just slide the grommet up to the top of the water tube flange and install the water tube into the inner exhaust housing this way. The grommet is fully supported and can not sneak up over the top of the water tube flange, minimizing the possibilities for grommet problems. This slight alteration has worked fine for me for many years, I still remember pulling my few remaining hairs out back in 1982 trying to diagnose a cooling problem before I gave up and pulled the powerhead. I also remember pulling the powerhead on this engine a few years later, just out of curiosity, to confirm that my alteration was working out OK.
Please know that this method will NOT work on later models with the second "update/improvement" to the water tube/grommet set up. This later design surely was an improvement, but the problem still existed because the top of the water tube was slightly lower than the top of the grommet. In these cases, I simply shaved off 1/8" off the top of the grommet.
The last water tube/grommet kit I bought seemed to be improved again, the top of the water tube was even with the top of the grommet.January 9, 2016 at 4:06 pm #29891PS I realize that one picture is worth several thousand of my words. I will attempt to draw some pictures if you are interested. Don
January 9, 2016 at 5:20 pm #29894Fleetwin, your advice makes perfect sense!
Yeah, mine had the grooved grommet. I like the idea of installing it so the tube sits right next to the power head, and will do so.
Although it will only see about one week a year in salt water, (if I’m lucky), and unlike my dear / stubborn father I will flush it after each salt use, I’m happy to take steps to avoid future grommet failure.
Appreciated!
Alan
 January 9, 2016 at 8:16 pm #29899
Maybe I’m stating the obvious, but did you remove the 3 screws on the TOP side of the pan (one aft, one on each port and SB sides)? If you didn’t remove these 3 screws, that thing isn’t going to go anywhere.
There’s the 6 lower powerhead screws, then the 3 topside ones, then the shift lever, detach the fuel pump. I use a pry bar at the back side of the motor, near the rear SB side, because it’s located away from the bottom side of the powerhead where if you accidentally ‘mar’ the metal casting, it *shouldn’t* affect water/exhaust going into the wrong placed.
Everywhere else looks pretty iffy in terms of really applying a lot of force. I don’t screw around when these are stuck, either. I get a good ‘grab’ with the tip of a pry bar, and give it a good whack with a 4 lb. mallet. I haven’t had one stay stuck yet, and if the bottom side of the powerhead has any distortion, I use gasket sealant to make up the difference (but that doesn’t generally happen, at least not enough where a new exhaust housing gasket…which you’ll probably need anywhere…can’t fix).
-
AuthorPosts

- You must be logged in to reply to this topic.