Home › Forum › Ask A Member › When a motor does overheat
- This topic has 14 replies, 9 voices, and was last updated 10 years, 9 months ago by
Goman.
-
AuthorPosts
-
August 20, 2015 at 5:41 pm #2315
What is the technique for checking to see that a cylinder head is still nice and flat? About the straightest tool I have would probably be my framing square. If I use it and look to see if any light passes through, will that be adequate? And how would I go about making it flat if it’s not perfect? Do I nee to have it re-surfaced?
I plan to install a new head gasket and torque the head bolts down to their proper foot
Lbs. what else should I do? Any rtv or gasket sealer of any kind.
Thanks!
ScottAugust 20, 2015 at 6:11 pm #22406Put a straight edge on the block and head individually going from opposite corners, try and pass feeler gauges underneath the straight edge.
You would have to check the book for what an acceptable measurement is, but if you can see light it is not a good thing.As for what straight edge, I don’t think a framer’s square is quite true enough.
If it is off a little bit you can try lapping compound on a flat surface, try your local glass shop, they might be able to give you a drop for cheap. Try for 1/4" or thicker. Also talk to granite counter installers, they usually have to cut out a chunk for the sink
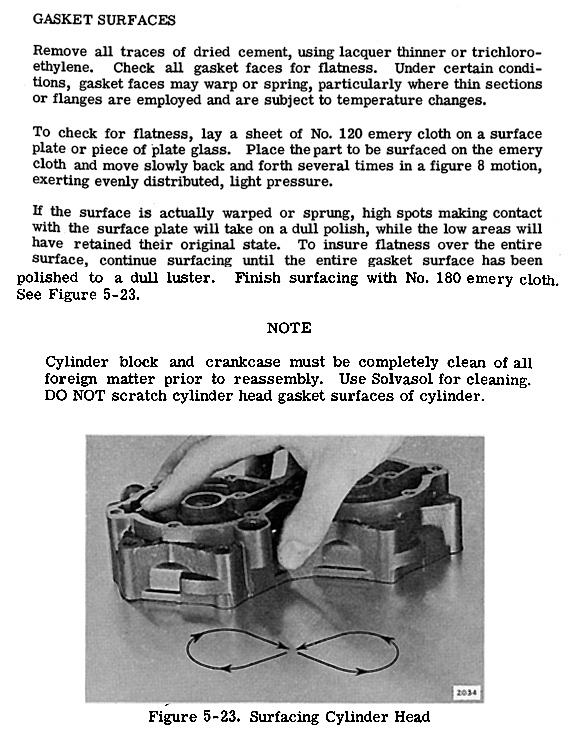
August 20, 2015 at 7:55 pm #22409Most guys just put a sheet of 120 grit emery cloth on a piece of flat window glass and run the head over it in a figure 8 pattern. do this till the gasket surface is shiny and even. That’s the Mumbles method. I believe Fleetwin does it the same way.
August 20, 2015 at 8:21 pm #22411A short length of 5/8" drill rod or old ‘known to be straight’ driveshaft makes an excellent straight edge! An eye threaded in the end keeps it hanging on the wall so it wont get stepped on when not in use. 😉
 August 20, 2015 at 8:42 pm #22412quote wannabe outboard guy:That’s the Mumbles method.
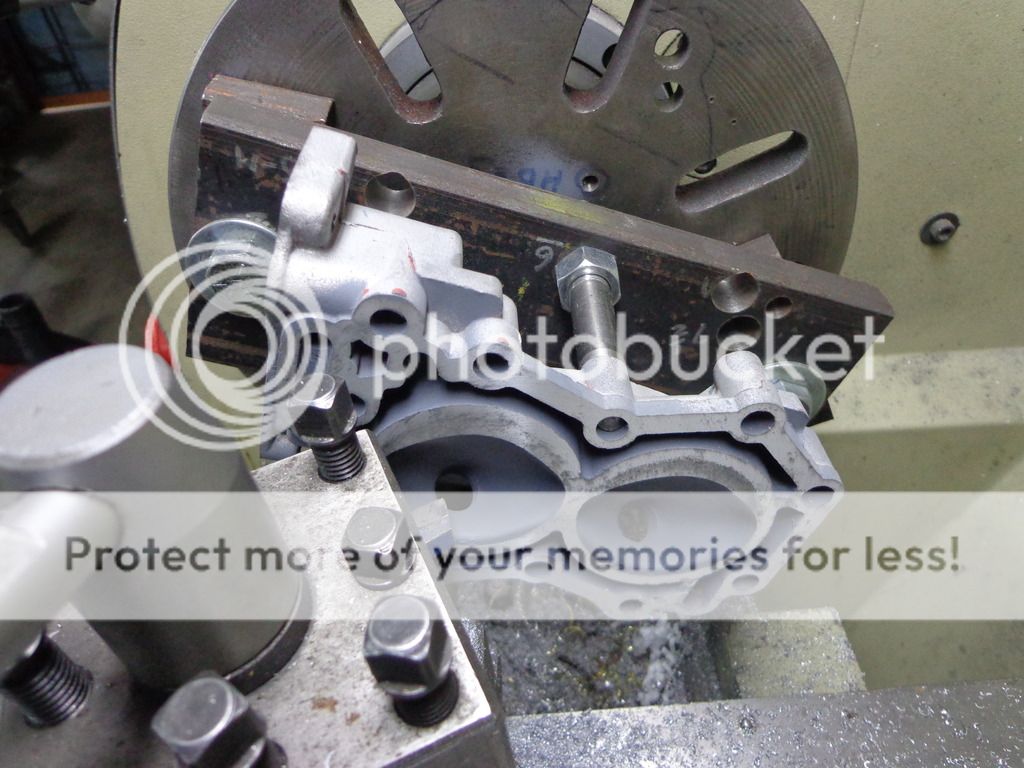
I only do that now with the ones I can’t figure out how to secure in the lathe. I sure wish I had a milling machine for stuff like this!
 August 20, 2015 at 9:31 pm #22413
Here is some information that will help you remove the cylinder head cover and clean out the pathways and replace the cylinder head cover and gasket.
Sorry, you didn’t supply the make, model , year or hp for your motor, so I just posted a tutorial I made for another guy. I removed some of the specifics as not to confuse you in regards to torque values of your motor.
***I promise you, you will do just fine. The procedure is very simple.***
Procedure:
1. Remove cowl. You will not have to remove the starter.
2. There will be 10 bolts to remove from the cylinder head. Be careful not to break off the head bolts if they seem to be stuck. If some or one seems stuck then howler back and someone will advise you how to remove the head bolts.***Not worried about this area***
Please clean any dried old sealer or clement on this bolts.
3. Once the 10 head bolts are removed then gently separate the cylinder head from the power head.
Try tapping on the side of the head with a plastic mallet or block of wood. And do it while the bolts are still in place but loose, so the head doesn’t fly across the room. Works every time. Using a screwdriver can damage the paint and or damage the gasket surfaces.
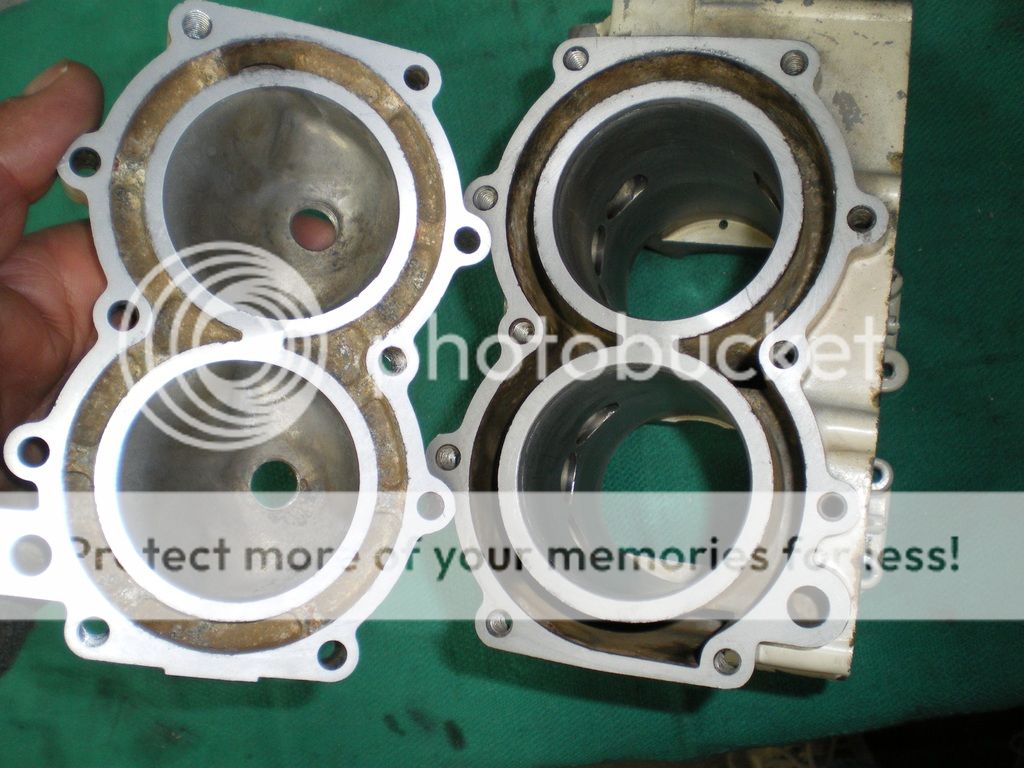
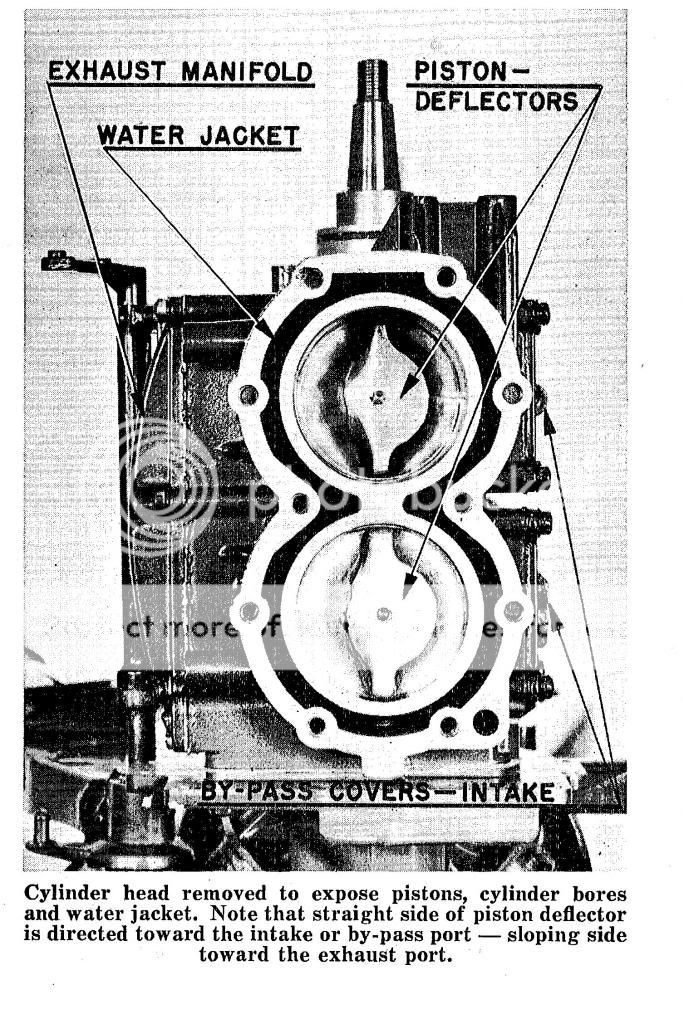
4. At this point you should be able to visualize the pistons, cylinders and water jackets (pathways around the cylinders).
Pull the starter rope until both pistons are even in the cylinders. If there is crud in the water jacket pathways then clean them up. Before cleaning the water jackets or power head’s cylinder head surfaces, please oil soak two small low lint rags and place them cylinders to block and prevent from getting garbage and stuff in them.
(I borrowed these pictures from a public website for better explanation.)
Also check the passages on the cylinder head it self for build up like sand, lime or silt or whatever. The pictures below is of a 3hp Evinrude/Johnson. It is an example how the trash can build up and prevent cooling of the power head.
5.) If there are remains of the previous gasket on the cylinder head cover or the cylinder head it self. Then take some carburetor cleaner and apply it on the gaskets to soften or partly dissolve the gasket material. Let it soak at bit. This will make it easier to remove the remains of the head gasket without man handling and possible gouging the mating surfaces. Use a dull flat putt knife to carefully remove the remains of the head gasket.
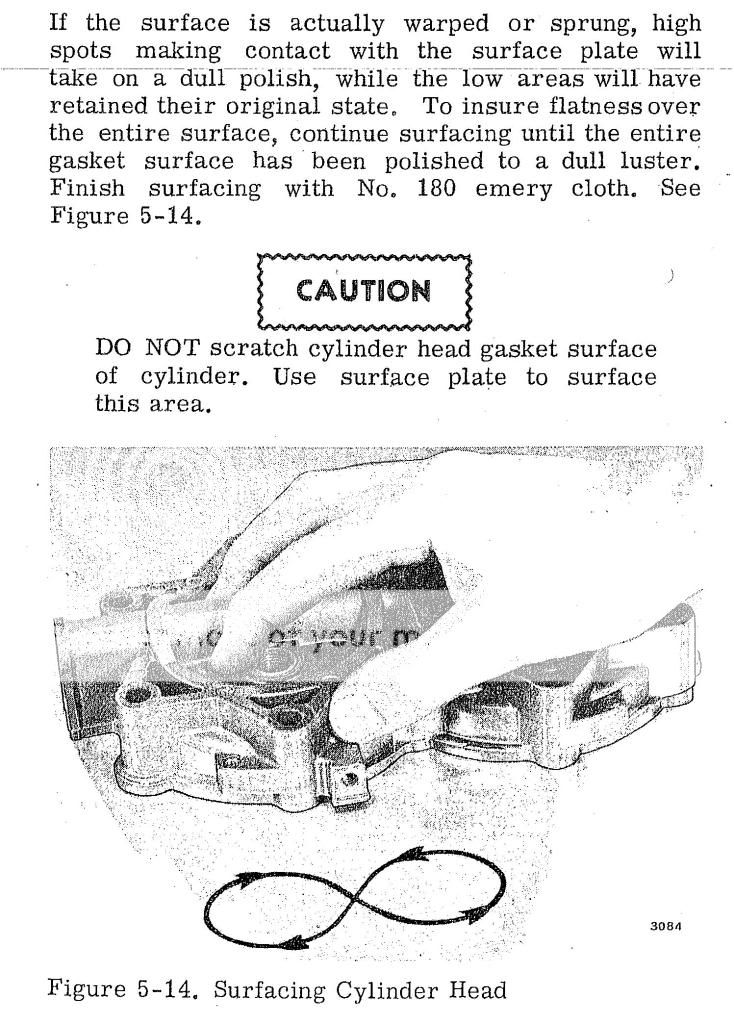
6.) Once all of the gasket material has been removed then you want to make sure the cylinder head cover is flat and true.
You are going to use a flat surface and a figure 8 pattern of motion to true up the surface. A flat surface like a like sheet of glass or straight sheet of metal. See the diagram below.
7. Once both mating surfaces are clean and the cylinder head is trued, then remove the oiled rags from the cylinder and make sure there is no trash, lint, grit or whatever in the cylinders.
8.) Now you can apply the cylinder head gasket.
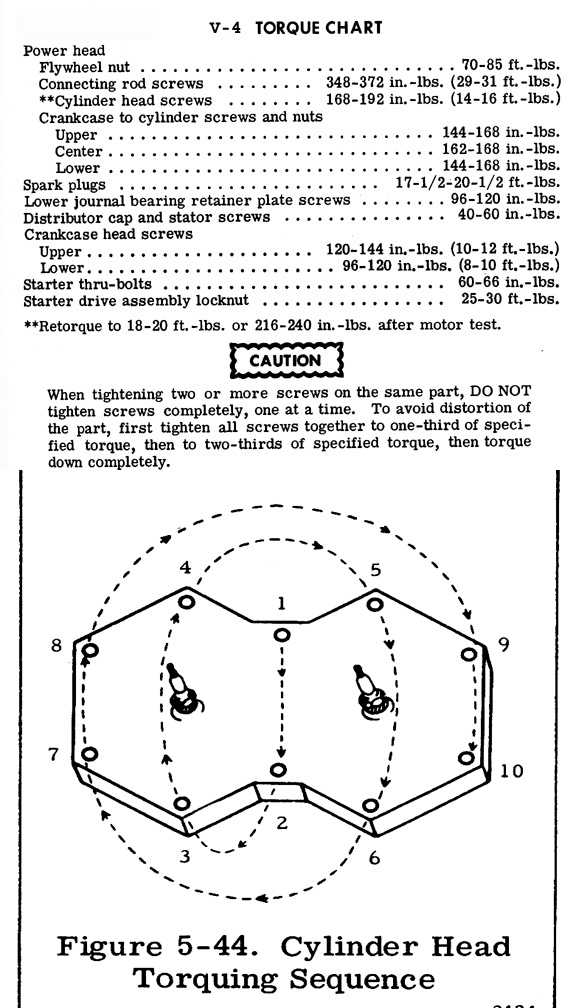
9.) Apply a thin coat of perfect seal #4 on the threads of the cylinder head bolts. Tighten each one hand tight then you will start the torquing sequence as label above in the diagram.
Perfect seal #4 OMC part number is 0508235
It is sold online on ebay and marineengine.com and your local dealership. I believe Evinrude and Mercury dealers may have some in stock. Just supply the above order/part number.
Use a torque wrench and following the torque sequence of the head bolts.
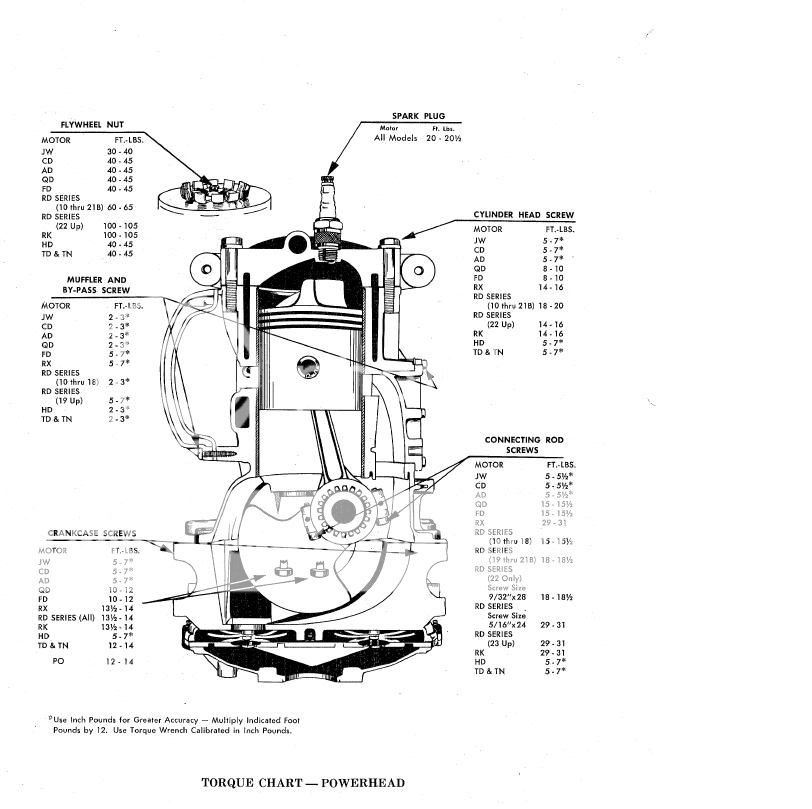
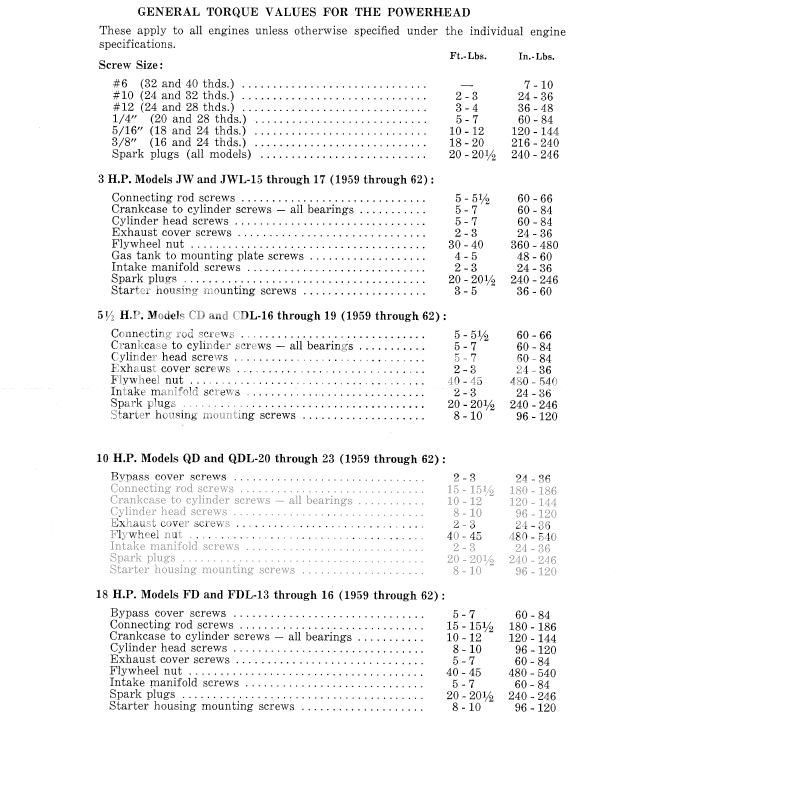
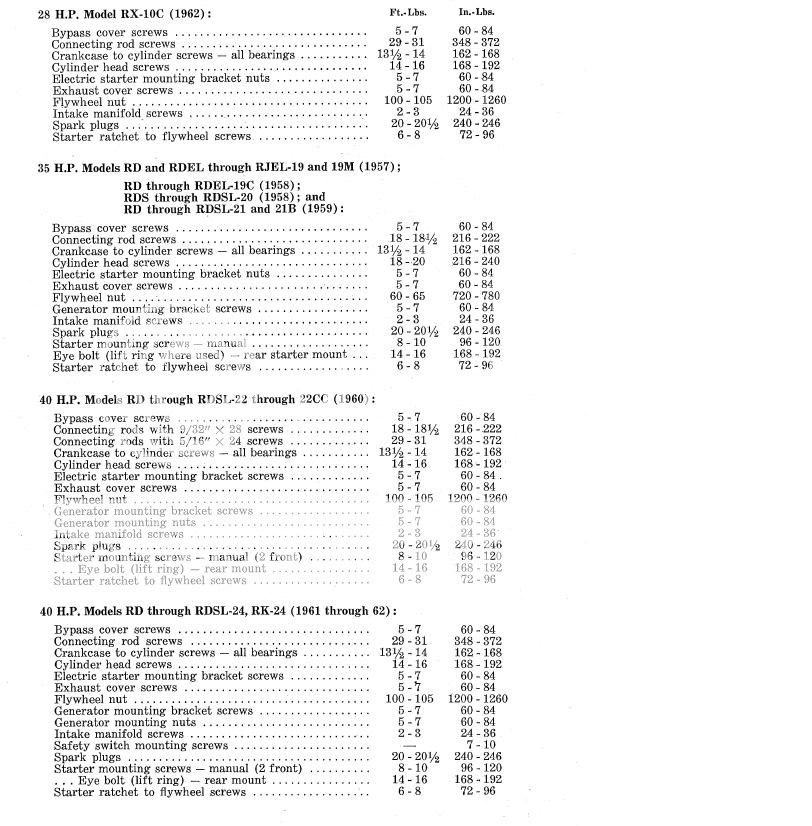
The torque values for your motor is
Here is link to torque values for the bypass covers and others.

Your going to make 3 torquing passing with the torque wrench.
1st pass is half torque value
2nd pass is 100% torque value
3rd pass will take place after you have started and warmed up the engine to a good running temp…about 5 to 10mintues. Shut the motor off and let it cool off. Then re-torque the cylinder head bolt in the correct sequence pattern to 100% of it torque value.
All done!!! 🙂 Now recheck your compression!!!
August 20, 2015 at 9:52 pm #22414From the Evinrude service manual – I use a 12" square polished marble floor tile from Home Depot …

 August 20, 2015 at 10:35 pm #22418
Mumbles, care to show how you attach that?
August 20, 2015 at 10:46 pm #22419Attached what?
August 20, 2015 at 10:53 pm #22420I wanted to see the how the lathe attachment holds onto the head.
-
AuthorPosts


- You must be logged in to reply to this topic.