Home › Forum › Ask A Member › 1937 Johnson LT37 distributor on flywheel
- This topic has 9 replies, 5 voices, and was last updated 6 years, 3 months ago by
 Buccaneer.
-
AuthorPosts
-
September 25, 2018 at 10:33 pm #11341
HELP !!!
Brand new member to the forum.
I recently acquired a Johnson LT37…..I am convinced that my problem is in the ignition system….I have never seen anything like this….it is a two cylinder motor with one coil. one set of points, one condenser, some coil brushes and some Bakelite/Copper strip, on the flywheel. After some research…..I beleive this ignition system was used on various other models back in it’s day.
Can anyone explain it’s operation in detail….ie funtion of the flywheel, ohm readings of coil (primary and secondary)
Thank you,
Kip
September 25, 2018 at 10:50 pm #83528I have some "notes" (not from me, but someone on this forum, so you could
search the site for the creator) from when I worked on my LT.
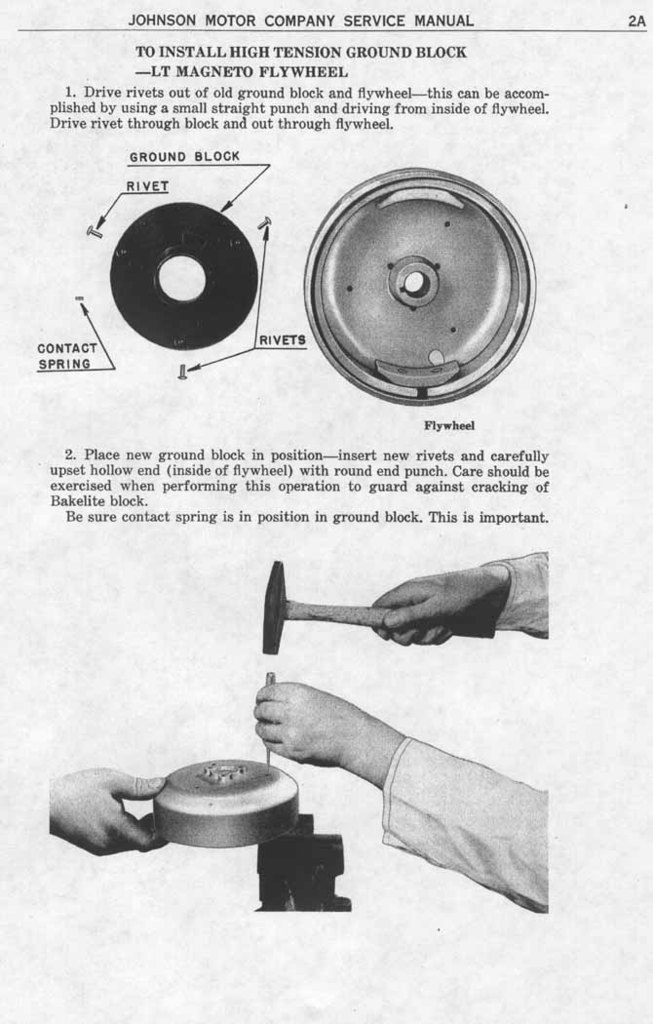
Also, information regarding the grounding plate.
Hope this helps.+++++++++++++++++++++++++++
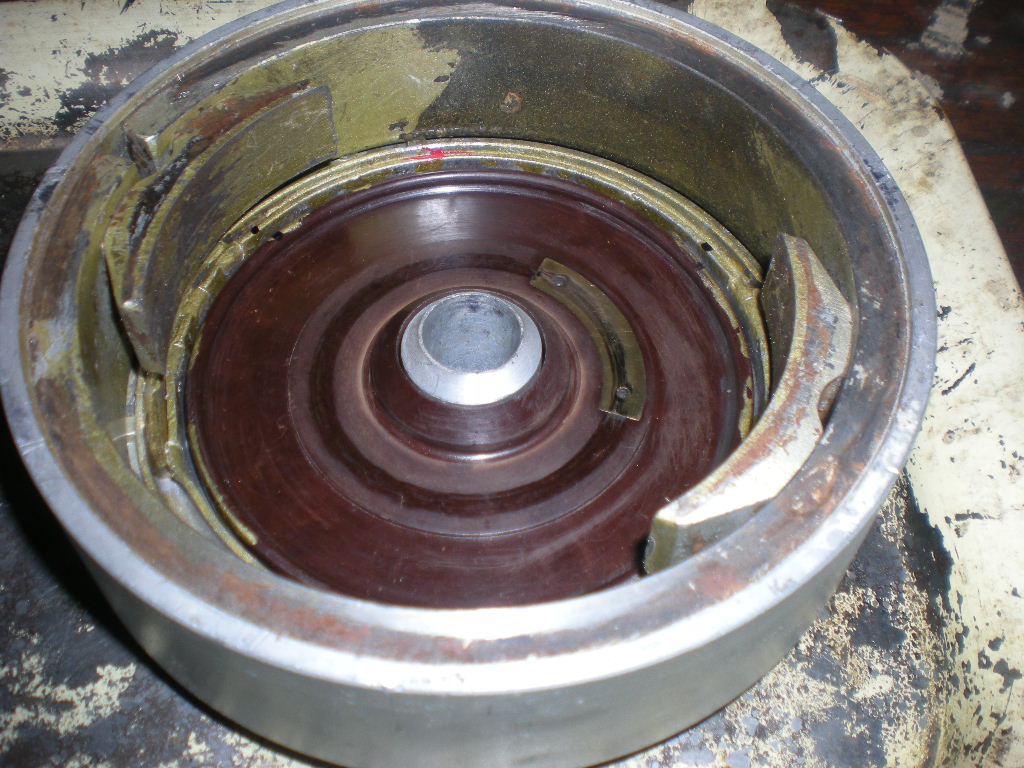
The points polish up nicely with croakus cloth or fine sandpaper. The weak point of the ignition system is the distributor. On the inside of the flywheel hub, there is a bakelite drum with a brass patch. As this brass patch comes around it contacts a brush finger that grounds out whichever plug is not firing. These fingers can be a bit fragile, or sometimes they get mis-adjusted and don’t contact the drum. Another problem is carbon streaking on the bakelite causing it to short out both sides. Points are set at .020 inch and the Champion J8J (modern CJ8) plugs are gapped at .030 inch.Cooling is pretty straight forward. It’s not the pressure-vac system. Instead, there is a plunger pump just above the prop. There are a few possibilities for problems here. Sometimes the eccentric on the prop-shaft can wear a hole in the bottom of the plunger. Just solder a penny over the hole. Sometimes the ball check valves can get stuck. Clean them with liquid wrench or PB-Blaster. There should be a tattle-tale pisser on the elbow on the port side where the cooling water enters the powerhead. Yes, I know the water pissing out is warm. It just came up a tube in the exhaust and picked up heat along the way. It will still cool the powerhead just fine as long as it’s water and not steam coming out.
Carburetion is a fun spot on these motors. Think of it as 2 carbs. Carb number one is between the center main bearing and the tank. It sorta looks like an inverted "Y". The top branch is an oil return line from the top main bearing. The port branch is your mixture needle. The starboard branch is a fuel line from the float bowl. This carb operates throughout the operating range of the motor and needs to adjusted first. A good starting point is 3/4 of a turn out from lightly seated. Carb number 2 only works whenever the throttle butterfly is open-that is, from "START" of to "FAST". After you get carb 1 adjusted for smooth idle, open up the butterfly and tweak the high speed needle. Again, a good starting point is 3/4 of a turn from lightly seated.
There’s no reed valves o the motor. Carb 1 feeds the mix into the crankcase via a rotory valve machined into the main journal. Carb 2 feeds into the crancase through a third port. 1/2 pint of oil (or more) per gallon of gas.
OK, now you got both needles open 3/4 of a turn, you’ve put the right mix in the tank and opened the fuel valve and the vent in the gas cap. Wrap the rope around the flywheel clockwise. Push down on the plunger about 5 times. This squirts gas directly into the throat of carb 1. The owners manual says 3 licks on the primer, but it seams to me the first few licks don’t do anything but fill the fuel line. You’ll hear the gas squirt. Now make sure you’re pointed towards open water and pull the rope. It should fire. If it starts to act like it’s starving, hit the primer another lick. Flooding? Slide the spark advance over to "FAST". And you’re off and running!
+++++++++++++++++++++++++++++++++++++++++++++++++++++++
Attachments:
Prepare to be boarded!
September 25, 2018 at 11:03 pm #83530Thank you Buccaneer,
You stated: "On the inside of the flywheel hub, there is a bakelite drum with a brass patch". Should this brass patch have continuity to ground/flywheel in order to ground the plug that is not firing… The one I have is open !!!
September 25, 2018 at 11:24 pm #83531quote kipp1234:Thank you Buccaneer,You stated: “On the inside of the flywheel hub, there is a bakelite drum with a brass patch”. Should this brass patch have continuity to ground/flywheel in order to ground the plug that is not firing… The one I have is open !!!
Yes, the brass contact is grounded to the flywheel under the bakelite plate
with a little spring. Most likely it rusted away.
I carefully ground off the bakelite plate’s rivet heads to
get mine apart, then epoxied the rivets when re-installing it.
Perhaps someone will have a better idea. Photos would help
when you get to that point.
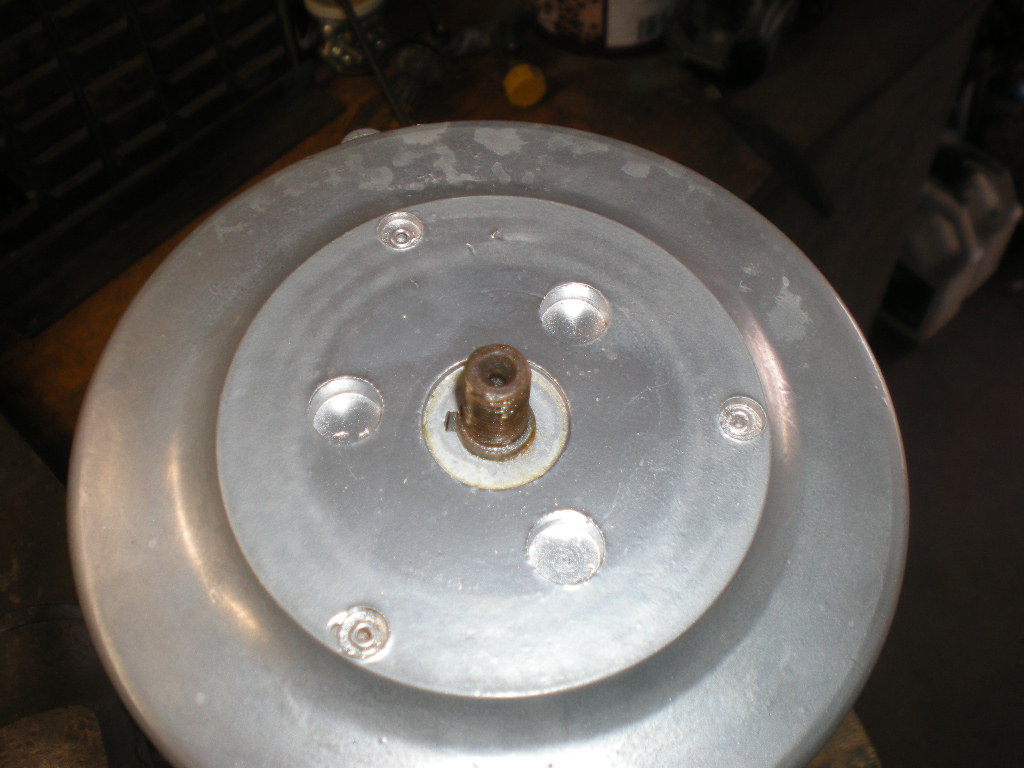
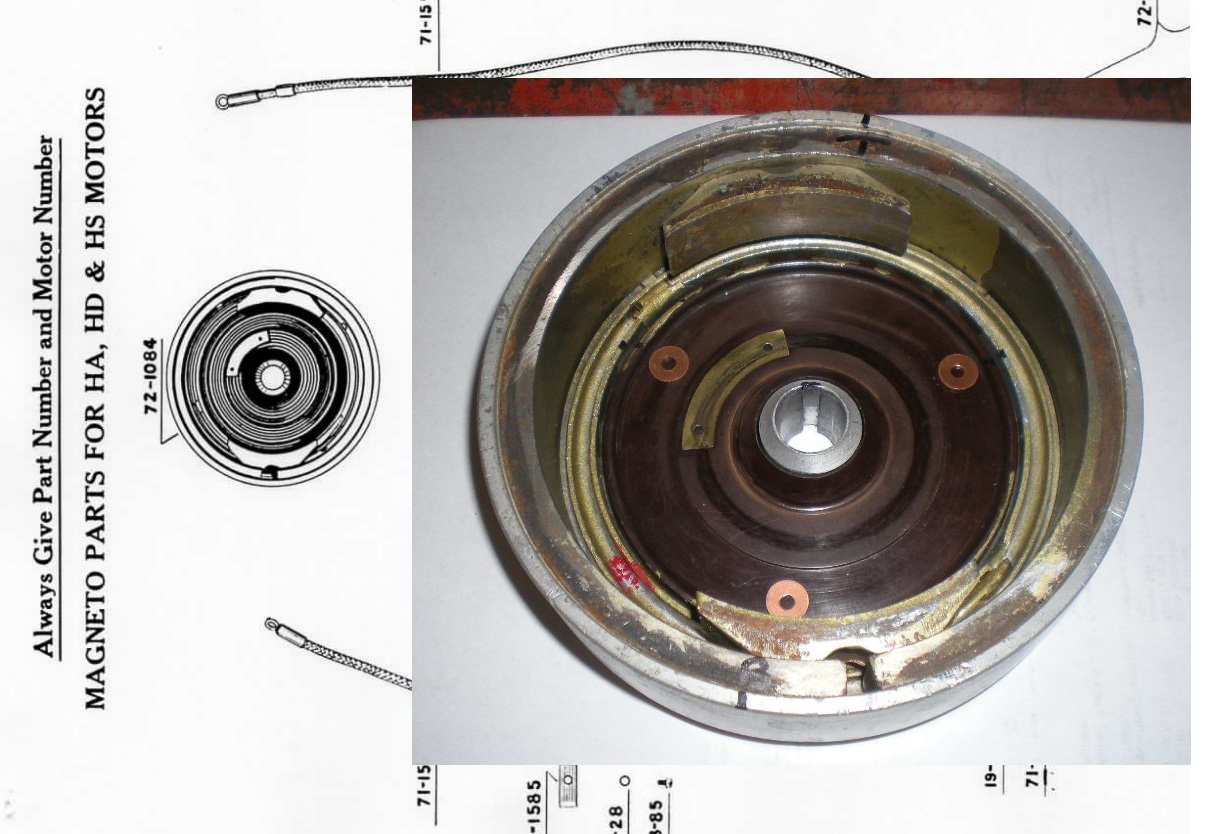
I just found photos of my HD-15, with the same type of magneto……
Make sure you mark the orientation of the bakelite plate before
you remove it.
Attachments:

Prepare to be boarded!
October 2, 2018 at 11:30 am #83859Thanks for the pictures !!!
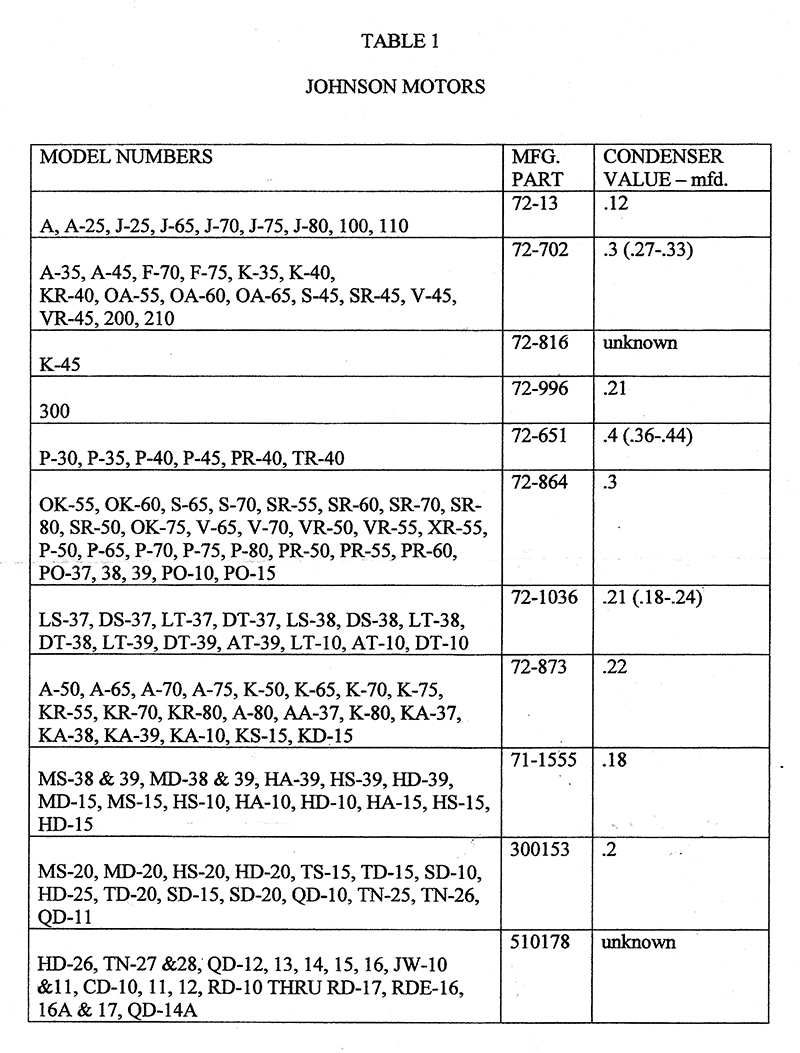
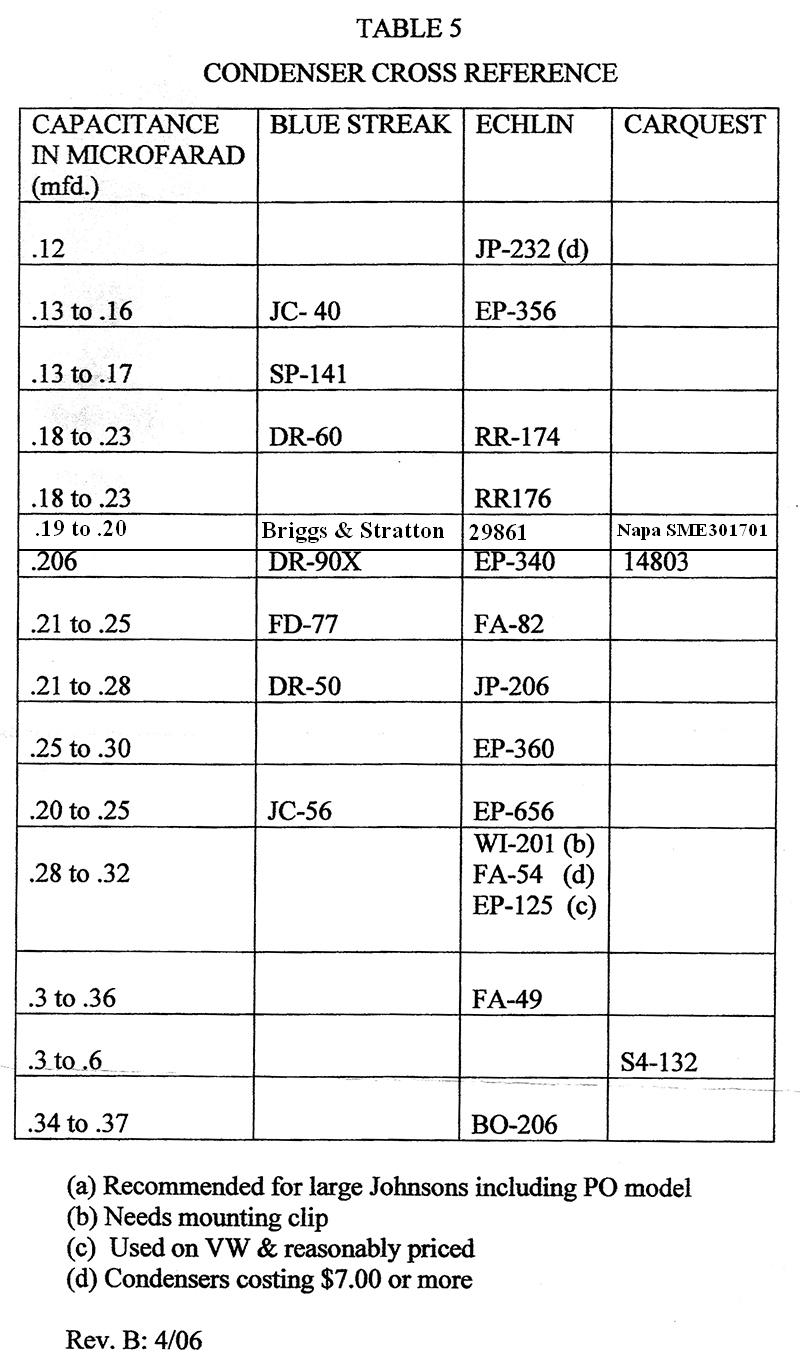
October 2, 2018 at 1:45 pm #83863Do you have a part number or a place to get a new condenser? I’m in the middle of trying to free up one cylinder on mine. when I do, I’m sure it will need a new one.
October 2, 2018 at 4:39 pm #83882quote destroyer85golf:Do you have a part number or a place to get a new condenser? I’m in the middle of trying to free up one cylinder on mine. when I do, I’m sure it will need a new one.Here’s the charts showing the original part number and what
"more modern" replacements may have the correct mfd rating.
An new electronics .20 capacitor would be a great replacement.
Search on this site and you should find out plenty about those.
Attachments:
Prepare to be boarded!
October 3, 2018 at 12:59 am #83901
A "Boathouse Repair" is one thats done without having tools or the skills to do it properly.
-
This reply was modified 7 years, 8 months ago by
Tubs.
-
This reply was modified 5 years, 4 months ago by
 Tubs.
Tubs.
April 2, 2020 at 11:26 am #199022Hello Me Matey — Buccaneer —Just joined as temp guest — have been net surfing to find most I can about my inherited LT37– Grandad and I used it in the early 70s– found in the boathouse this summer ..
All apart — JUST freed up the one seized cylinder after weeks — final try — built a spring tensioned puller on backside to connecting rod pin — and boiled , submerged in fiATF filled trash can– inside a ductwork ‘kiln’ i built — tiger torch, anyway OUT — no scoring– just residual varnish… ( i am retired engineer– all auto)I love the files on serials you have posted — The LT37 (aka “The Bee”) was built in “Peterboro” and has a serial “33072” — wondering how many made, can the serial tell date of build, etc NOW going to fake-out Magneto by temp rebuild minus pistons and use drill to drive shaft to rotate — BUT need new wires — one does still have a tag for “Top” on it — (cylinder) but no ”cap’ — and both very dry– can i source old stock??? or com parables??
Thanks — PS We have boated, cottaged — on family island “Strathaven” — started post WW1–
April 2, 2020 at 2:45 pm #199038HayFever, Brillman.com use to sell the sparkplug boots, and the wire core sparkplug wire,
or you can find them on Ebay……..
https://www.ebay.com/itm/2-Spark-Plug-boots-7MM-for-outboard-small-engine-chainsaw-lawn-mower-NEW/133282075197?hash=item1f083b123d:g:gboAAOSwW2hd~-le
They’re sometimes refered to as the “sparky” style boots.
Glad you got the power head freed up! and no fire departments were called, lolPrepare to be boarded!
-
This reply was modified 7 years, 8 months ago by
-
AuthorPosts
- You must be logged in to reply to this topic.