

Home › Forum › Ask A Member › Top pull cord does not pull to start motor:
- This topic has 40 replies, 8 voices, and was last updated 1 month, 1 week ago by
CFB.
-
AuthorPosts
-
July 29, 2026 at 11:15 pm #325392
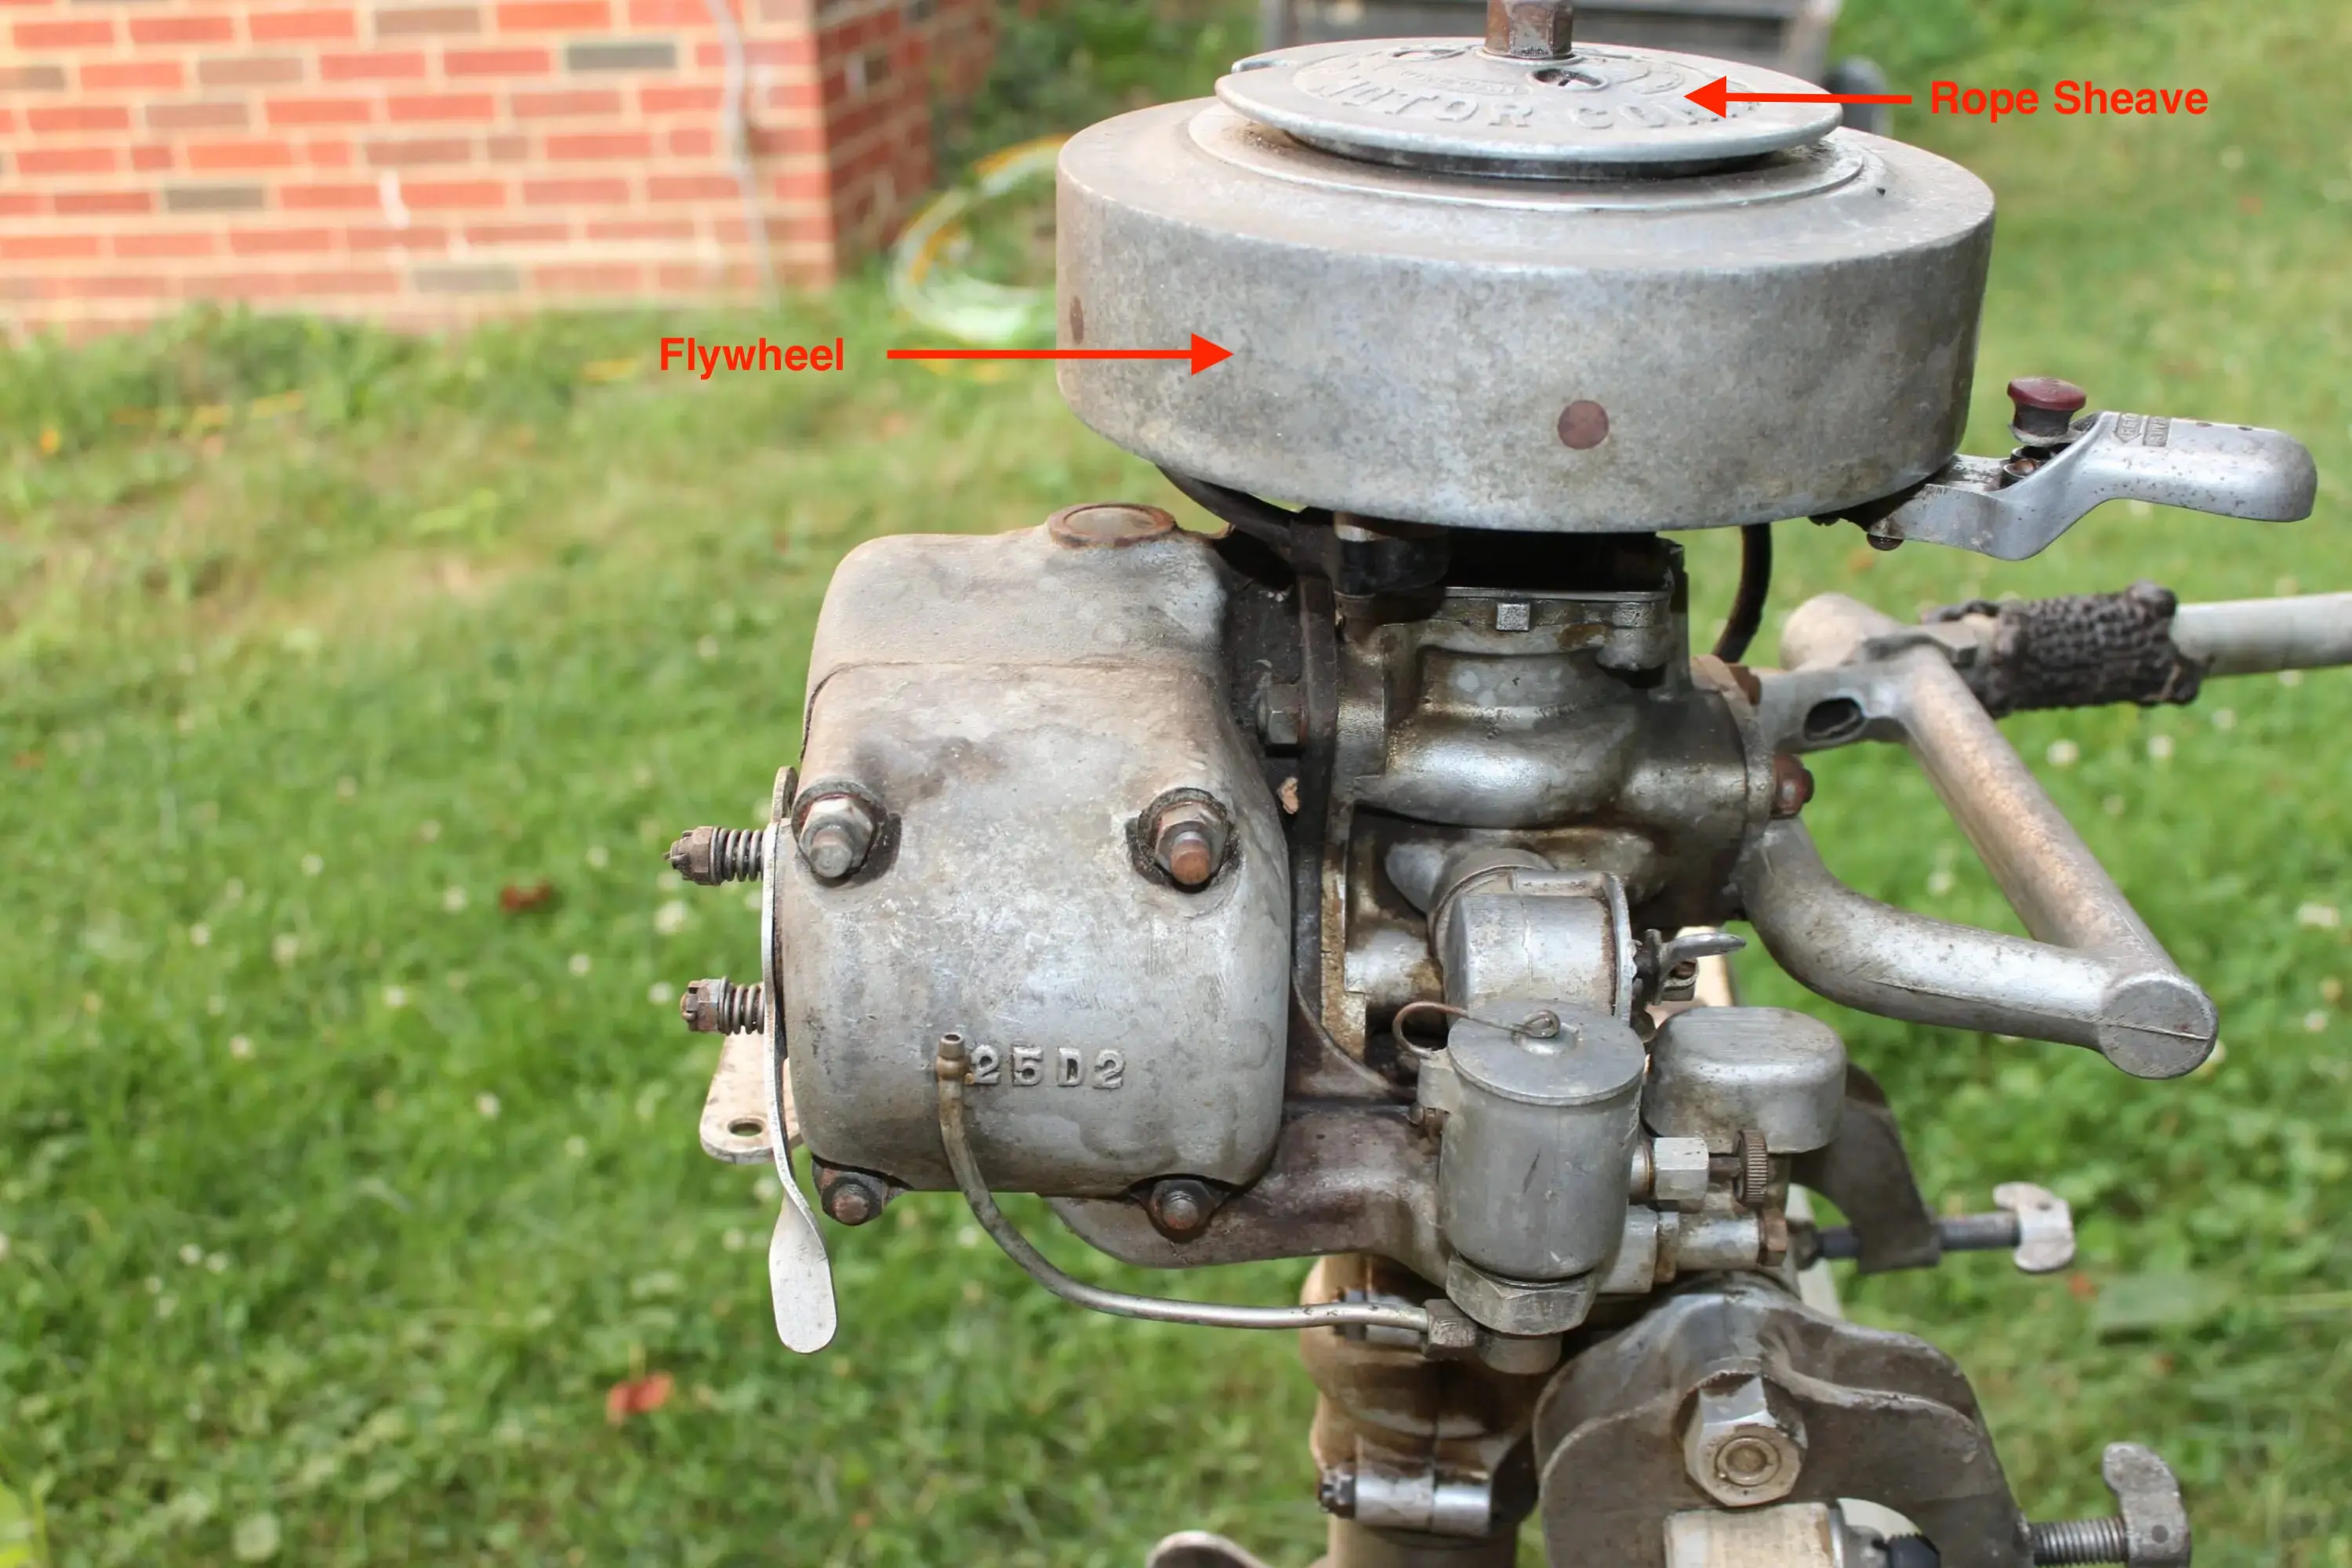
The flywheel is that big round , cake pan shaped part that the rope starting sheave is screwed on to. If you can get a strap wrench around the flywheel as suggested that will afford you the greatest leverage. Now, if you are creative, a strap wrench can be improvised by attaching a length of rubber strap ( use a discarded automotive reserpine belt ) to a length of 2X2 wood.
Joe B
1 user thanked author for this post.
July 30, 2026 at 5:52 am #325408Wrap it around the flat part of the flywheel. The widest part while still attached to the motor.
1 user thanked author for this post.
July 30, 2026 at 1:52 pm #325422Sorry to ask to cover this, but the flywheel then is under that aluminum lid that I put the rope around, right? I need to remove that top lid if you will, where the stamped or pressed Johnson Motor Company is seen?
so to remove that lid, if so, do I just unscrew that nut that I tried earlier to turn clockwise? Or remove that and the three screws on top too?
thank you. Just want to be sure.
July 30, 2026 at 3:15 pm #325425I marked up your picture to show the flywheel and the rope sheave (what you called the aluminum lid). The sheave is what you wrap the starter rope around to start the motor. What has been suggested to free up your motor is to wrap a strap wrench around the perimeter of the flywheel and see if you can rotate the flywheel to free up the stuck pistons.
You don’t need to remove the flywheel or the rope sheave before you get the motor freed up. If you want to remove the rope sheave off the top of the flywheeel you would just remove the 3 slot head screws. The flywheel is removed by removing the center nut. But again, you should get the motor freed up first before removing the sheave or flywheel. You need to leave the flywheel on to get the motor unstuck first.
Bob
1937 Champion D2C Deluxe Lite Twin
1954 Johnson CD-11
1955 Johnson QD-16
1957 Evinrude Fastwin 18
1957 Evinrude 3022
1958 Johnson QD-19
1958 Johnson FD-12
1959 Johnson QD-20
1982 Evinrude 25hp“Every 20 minute job is only a broken bolt away from a 3-day project.”
"Every time you remove a broken or seized bolt an angel gets his wings."1 user thanked author for this post.
July 30, 2026 at 9:16 pm #325457Thank you. This is perfect for me. I wanted to first mark up a picture for the group but don’t know how to do that yet. Thank for the extra time. Its on its side so I’ll let it soak a few more days and tackle it this weekend..
July 30, 2026 at 10:20 pm #325463I marked up your picture to show the flywheel and the rope sheave (what you called the aluminum lid). The sheave is what you wrap the starter rope around to start the motor. What has been suggested to free up your motor is to wrap a strap wrench around the perimeter of the flywheel and see if you can rotate the flywheel to free up the stuck pistons.
You don’t need to remove the flywheel or the rope sheave before you get the motor freed up. If you want to remove the rope sheave off the top of the flywheeel you would just remove the 3 slot head screws. The flywheel is removed by removing the center nut. But again, you should get the motor freed up first before removing the sheave or flywheel. You need to leave the flywheel on to get the motor unstuck first.
Yes, do what Bob says! If you rock the flywheel back and forth with the nut loose you will ruin the flywheel keyway! Don’t ask me how I know this. Some people just gotta learn things the hard way!
dale
1 user thanked author for this post.
August 1, 2026 at 12:07 pm #325550I got my old belt and was able to spin the flywheel about an inch, reversed the belt and was able to spin it the other way. It was not easy though. So back on the side for soaking.. I think I’m going to spin it again clockwise and leave it in that position to resume soaking.
Funny, I thought that flywheel was just a fix, immoveable pan like the old car air cleaner housings. But I looked underneath it to see it separated.
And so 10 minutes later when I went to spin it clockwise, got maybe two more inches. now soaking. Encouraged!
August 1, 2026 at 10:23 pm #325583OK, you’re definitely on the road to recovery. Continue soaking and working the flywheel back and forth. Don’t force it – patience brings joy.
Bob
1937 Champion D2C Deluxe Lite Twin
1954 Johnson CD-11
1955 Johnson QD-16
1957 Evinrude Fastwin 18
1957 Evinrude 3022
1958 Johnson QD-19
1958 Johnson FD-12
1959 Johnson QD-20
1982 Evinrude 25hp“Every 20 minute job is only a broken bolt away from a 3-day project.”
"Every time you remove a broken or seized bolt an angel gets his wings."1 user thanked author for this post.
August 2, 2026 at 2:26 pm #325601Congratulations ….not only does it appear that you are freeing up the motor but also learning a bunch along the way. Keep up the good work and never hesitate asking questions
Joe B
1 user thanked author for this post.
August 3, 2026 at 1:28 pm #325632Aug 3 update: Was able, with strap, to turn flywheel completely around and back and more than one turn too. Also am able now to move the flywheel by hand as well as spin it with the pull cord.
As I brought the motor back to the horse to spin the flywheel, oil came out the bottom above the prop. Is that the penetrant I had down the spark plug holes? Is that area, I hope the green stick shows up in the attached picture, an exhaust? Does this mean I have damage in the cylinder allowing that leak?
Should I continue to soak or flush?
Thank you all again for your time.
(anecdotally: I visited my son who at the time was replacing his 1996 ranger cam timing gear. My job was to stick my finger in the #1 spark plug hole to feel the compression as he turned the engine to the correct position before removing. So I did that too on this motor and felt the compression as I spun the flywheel)
-
AuthorPosts


- You must be logged in to reply to this topic.