Home › Forum › Ask A Member › 1952 Johnson Seahorse RD12 25 HP – Removing Flywheel and Source for Ignition Parts
- This topic has 27 replies, 17 voices, and was last updated 5 years, 8 months ago by
1949-penn-yan.
-
AuthorPosts
-
August 14, 2018 at 9:41 pm #81149
If the coils have never been changed out before then they are 66 years old. They’re not that expensive and since you going to replace everything else why not replace the coils too while you’re at it.
I buy all my parts on line from MarineEngine.com and they have the fastest shipping of any place I’ve ever dealt with. They’ve got schematics showing part numbers on their site for just about all the old Johnson/Evinrude outboards.
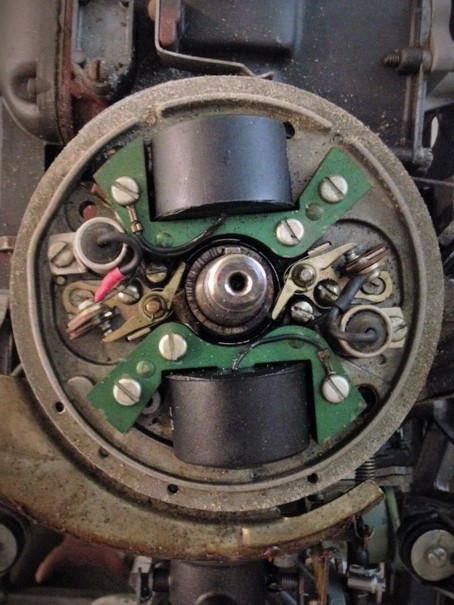
http://www.marineengine.com/August 15, 2018 at 7:02 pm #81222Thanks for your reply. Please refer to the attached picture. Everything looks nice and clean, with no cracks. Prior to removing the flywheel, I gently filed the points (and checked the gap), but it made no difference.
I seem to recall the shop that I bought the motor off of in 2007 stating that the points, condensers and coils were new, and their condition supports that. Under 25 hours of primarily salt water use since that time. Engine is always flushed with fresh water afterwards and washed with soap and water. Stored indoors.
Thanks,
John
Attachments:
 August 16, 2018 at 3:02 pm #81289quote 1949 Penn Yan:Thanks for your reply. Please refer to the attached picture. Everything looks nice and clean, with no cracks. Prior to removing the flywheel, I gently filed the points (and checked the gap), but it made no difference.
I seem to recall the shop that I bought the motor off of in 2007 stating that the points, condensers and coils were new, and their condition supports that. Under 25 hours of primarily salt water use since that time. Engine is always flushed with fresh water afterwards and washed with soap and water. Stored indoors.
Thanks,
John
It looks like the insulation is broken on the coil wires that are visible in the picture especially the one at the bottom of the photo. I can’t enlarge the photo enough to tell. Is that bare wire showing?
Also the condenser at the left in the photo, the one with the pink insulation, is an aftermarket condenser but the one on the right looks like the original condenser. They both weren’t changed at the same time it would appear anyway. Condensers are cheap I’d replace them both. In fact if it were me I’d replace everything because it all looks old to me. Just my opinion.
I just replaced everything in my 1957 Evinrude Fisherman 5.5 hp. If it’s worth doing then do it right is words to live by. 🙂
 August 16, 2018 at 4:27 pm #81306
Nicely spotted! Both coil wires are indeed worn, one through the insulation to the wire, and the 2nd almost as bad. That explains why one cylinder has no spark and the other intermittent (at best), as they have clearly been grounding out due to rubbing.
I will go ahead and replace everything, ordering the parts through http://www.marineengine.com/
MANY thanks for everyone’s contributions. I’ll post if I encounter any problems.
Cheers,
John
August 16, 2018 at 6:21 pm #81314I believe the worn wires are only ground wires. Just move the wire away from the bottom of the flywheel that they are rubbing and if the wires are stil intact you could put on a dab of liquid electrical tape. Then test the coils. A lot depends on whether you will just use on a small lake or on the ocean. 😀
August 16, 2018 at 7:37 pm #81317I find these wires with the insulation worn through quite often. I usually slide a short piece of 1/4" marine heat shrink over the ring terminal and down to where it meets the coil. Shrink it over the worn spot and bend it tight against the back of the coil while the heat shrink is still warm. Hold it there until it starts to set and it will be insulated, protected, and will stay out of the way from then on. So far I have never had a problem with this repair.
-BenOldJohnnyRude on YouTube
August 16, 2018 at 7:42 pm #81318Looks like the upper crank seal might be loosing its load…. look at the points cam….
http://www.richardsoutboardtools.com
classicomctools@gmail.comAugust 17, 2018 at 2:50 pm #81366Thanks for the additional comments. I was hoping that the worn wires weren’t ground wires, which therefore kills my theory.
"Looks like the upper crank seal might be loosing its load…. look at the points cam…."
That’s residue from the penetrating oil I used on the flywheel (overnight) before removing it. I’ll ensure that it’s clean, as I’m aware that the factory service manual is clear that it needs to be installed dry.
Cheers,
John
August 17, 2018 at 4:37 pm #81369
When experiencing ignition issues it is best to start with the basics. Here are some videos I put together about 4 yrs ago to help out a fella. They are step by step, so just bare with the step by step and follow along. These videos should help you find your ignition issue. Then you can tackle the carburetor…..lolThey are broken up in 10 min segments because originally You Tube did not allow me to post the whole video, so I had break them up in 10 min segments to post. I did them in the spur of the moment, to help a fella out and just left them up on You Tube.
Please get an adjustable open air gap spark checker. You will see one displayed in the videos.
Evinrude Gale and Johnson ignition video part 1 of 7
https://www.youtube.com/watch?v=oTN8Ag_aj-8Evinrude Gale and Johnson ignition video part 2 of 7
https://www.youtube.com/watch?v=r7A6d8me0GwEvinrude Gale and Johnson ignition video part 3 of 7
https://www.youtube.com/watch?v=ZAlT32NnTJ0Evinrude Gale and Johnson ignition video part 4 of 7
https://www.youtube.com/watch?v=re6FgcB_YokEvinrude Gale and Johnson ignition video part 5 of 7
https://www.youtube.com/watch?v=ClGt6xHnb94Evinrude Gale and Johnson ignition video part 6 of 7
https://www.youtube.com/watch?v=taaSzp1Ev-0Evinrude Gale and Johnson ignition video part 7 of 7
https://www.youtube.com/watch?v=p7w0xW48YCUCheers,
Cajun
August 21, 2018 at 12:14 am #81510Cajun,
I watched all of the videos, with MANY thanks for taking the time to create those, as they were very helpful.
UPDATE
Now that the flywheel is off, I had time to investigate things in more detail this weekend. I immediately noted that the points were not closing all the way.
I took time to thoroughly clean the points, remove and inspect the breaker points cam. On one set of points, I can set them to the factory spec of .020". When at the low point on the breaker points cam, however, they will not fully close. The gap is .007".
On the other set of points, I can’t get the setting to the factory spec of .020. I can get it if the points anchor screw is not tightened, but as soon as I tighten it the gap increases to just above .020". No adjustment of the adjustment screw will fix it. And to top it off, like the other set of points, the points won’t fully close when on the low side of the breaker points cam.
I am lining up the points rubbing block with the "TOP" designation on the breaker points cam. The rubbing blocks on the points (where they ride against the cam) are in pretty good shape. I spent a lot of time trying rectify both problems, but to no avail. I’m perplexed, and would appreciate any guidance.
Other
I went to http://www.marineengine.com/, but they note that they do not sell parts for engines older than 1955.
Thanks,
John
-
AuthorPosts
- You must be logged in to reply to this topic.