Home › Forum › Ask A Member › 1954 Evinrude Super Fastwin 15
- This topic has 36 replies, 13 voices, and was last updated 6 years, 9 months ago by
ryanjames170.
-
AuthorPosts
-
May 14, 2015 at 10:51 pm #1491
Just heard about the site and decided to register. I picked up this 54 Fastwin the other day for a song and just thought I’d show it off. Seems to be in pretty good shape for the year. As soon as the parts come in I’ll be doing a carb kit and lower unit seal replacement (found some water in there). I’m sure I’ll come crawling back during the LU operation for advice as I have always been too afraid to tear into one so this will be my first.
Oh! And if anyone has a digital copy or any idea where I might find/buy a legitimate service manual for this old girl please let me know!

 May 14, 2015 at 11:08 pm #15979
Boy, that is a beauty, and welcome!
You will want to pressure test the gearcase prior to disassembly to isolate the leakage problem in the gearcase. You will probably want to find a service manual prior to disassembly and resealing. This is not a hard job, but the details mean everything. The last thing you want is for leaks to continue after resealing. You will want to replace the water pump impeller while the gearcase is off as well.
You need to check the ignition system as well. You can sneak a peak by removing the recoil, then removing the inspection plate on top of the flywheel. Look at the coils through the flywheel, if they are cracked, they will need to be replaced. You will need a flywheel puller to get that flywheel off. Please don’t rap on the crankshaft threads while prying up on the flywheel to pop it off.
Find a decent service manual, along with a parts list, take your time, we are here to help. Those super fastwins are great engines, you will enjoy it!May 14, 2015 at 11:13 pm #15980quote fleetwin:Boy, that is a beauty, and welcome!
You will want to pressure test the gearcase prior to disassembly to isolate the leakage problem in the gearcase. You will probably want to find a service manual prior to disassembly and resealing. This is not a hard job, but the details mean everything. The last thing you want is for leaks to continue after resealing. You will want to replace the water pump impeller while the gearcase is off as well.
You need to check the ignition system as well. You can sneak a peak by removing the recoil, then removing the inspection plate on top of the flywheel. Look at the coils through the flywheel, if they are cracked, they will need to be replaced. You will need a flywheel puller to get that flywheel off. Please don’t rap on the crankshaft threads while prying up on the flywheel to pop it off.
Find a decent service manual, along with a parts list, take your time, we are here to help. Those super fastwins are great engines, you will enjoy it!Thanks for the tips! The water pump assembly has already ordered just forgot to include it. I have an original parts list that came with it that I have been using to reference new part numbers. I’m currently trying to figure out how to pressure test one of these…. I have read several forums that recommend this before changing the seals, I just don’t know how to do it. I’m also currently lookin for a good manual. The last thing I want to do is get her all put back together and feel like. Champion just to have it leak again and deflate my newly developed ego.
May 14, 2015 at 11:22 pm #15982There is a company called stevens instruments that makes pressure testers. Yes, they are very expensive. But, I think you can just buy the threaded tips that fit into the gearcase and make your own pressure tester inexpensively.
http://www.stevensinstrument.com/gearcase.htm
PS-Don’t remove that small phillips screw located near the lower oil fill screw! The phillips screws holds the shift linkage in place inside the gearcase. Once that screw is removed you will have to disassemble the gearcase to get the linkage back together. But, now that I think of it, your gearcase may NOT have that small phillips screw. In any event, don’t remove it if is there, until you are ready to disassemble the gearcase.May 14, 2015 at 11:27 pm #15984I hadn’t noticed it but thanks for the warning! Things like that are the reason I’m not tearing into that thing until I have a manual.
May 14, 2015 at 11:50 pm #15989I’m an Evinrude man, but I have to tell you the Evinrude factory service manual for those years is — er — well a disappointment. Just use this, Johnson but much more informative. They didn’t have a 15 that year, but there is much similarity between various years and models.
http://boatinfo.no/lib/johnson/manuals/ … .html#/154May 14, 2015 at 11:54 pm #15991FrankR I really appreciate it. I’ll have to view it tomorrow at work but I’m sure its better than the nothing I have now!
May 14, 2015 at 11:55 pm #15993
Welcome Jake11,Pretty motor you go there. I’ll give you this bit of advice. Please be methodical in your assessment and diagnostics of the motor. It is easy to jump from one problem to another and change this part and that part. You will save your self a lot time and money by being patient and evaluating the motor.
A good step series of evaluation is compression first, then electric second and then fuel delivery.C = compression (use a compression gauge)
S = spark (spark gap checker)
F = Fuel deliveryAnother bit of advice, is do not assume the person who had the motor before you did the service to motor correctly even if they said they brought it to mechanic. There are plenty of mechanics that are not familiar with the repairs of this age motor.
Correct fuel to oil ratio is 24 to 1.
I will supply some information that will help you along.
First compression
Go to Auto Zone or similar store, they loan out a compression gauge with a deposit. Check your compression on your top and bottom cylinder. Just wanting you make sure you do not have compression issues. You can wrap a pull rope around the flywheel and manual pull until you get your spring starter repaired.
Here is a link to show how to do a compression test. ***Please let me know what the compression value is*** You may have to pull the rope 4 or 5 times to get maximum compression reading and pull on the rope like you mean to start it. Reminder, remove both spark plugs then test one cylinder at a time.http://www.youtube.com/watch?v=PyCw4SiuT2I
Second Spark
Your going to need to inspect your point, condenser and coils. They are located under the flywheel. Hopefully all you need to do is clean and regap your points and you might be in business. Still check your coils and condensers and plug wires.
Here is how to pop your flywheel off and it gives you information about re-torquing you flywheel nut.
http://forums.iboats.com/showthread.php?t=294072
Here are two link to show you how to test your coils and condensers.
http://www.youtube.com/watch?v=KT8rk5QWgS0
http://www.youtube.com/watch?v=l6eSX…_order&list=UL
Here is a diagram of a generic OMC (Johnson/Evinrudle/Gale) ignition assembly. You will have to remove the coil designated for the top cylinder and put the oil wicker in. It should be already be coated with a very light oil. (not grease). The purpose of the oil wicker is to lightly lubricate the outside riding surface of the cam so the point shoes do not prematurely wear. If you look at the points they have little shoes that ride along the cam.
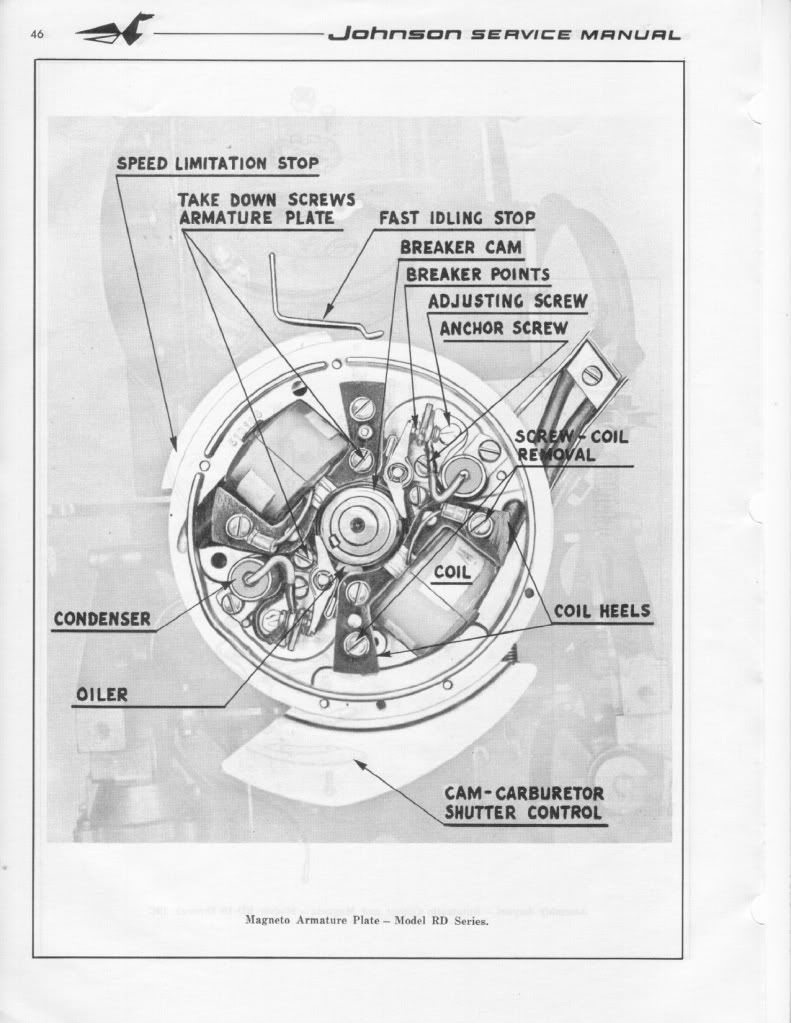
FYI: You can only set(gap) one set of points at a time. Put the flywheel nut back on(turn with a wrench or ratchet clockwise) to allow you turn the crankshaft. (Please remove both spark plugs to make it easier to turn the crankshaft and prevent accidental starting)
You gap the point to 0.020 when the point shoes is at the top(high point of the cam). It should have a mark along with the word top. Then you will turn clockwise to the next set of point 180 degrees and set those points the same way. You will notice that the point of the previous set will be closed and when you come around again they will open up. *** When they are open no current is allow through. This is how you set your timing with the points.***
When you go to set the point’s gap. Very gently snug the anchor screw, then adjust the gap with adjusting screw and the feeler gauge until the feeler gauge is sliding through with slight resistance only. Then tighten the anchor screw. Repeat procedure with second set of points. Please make sure your hands are clean and the feeler gauge is clean, because oil on the points can foul them up and create resistance….poor or no no spark. ALways use a spark check to evaluate spark. It should jump minimum 1/4 inch. Blue sharp snappy spark.
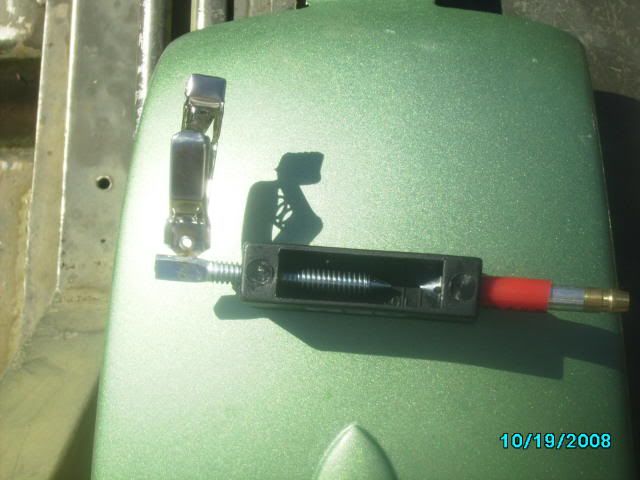
Here is a picture of a spark check…Cheap $6
Here is a picture of how to tell which wire is going to the correct cylinder.
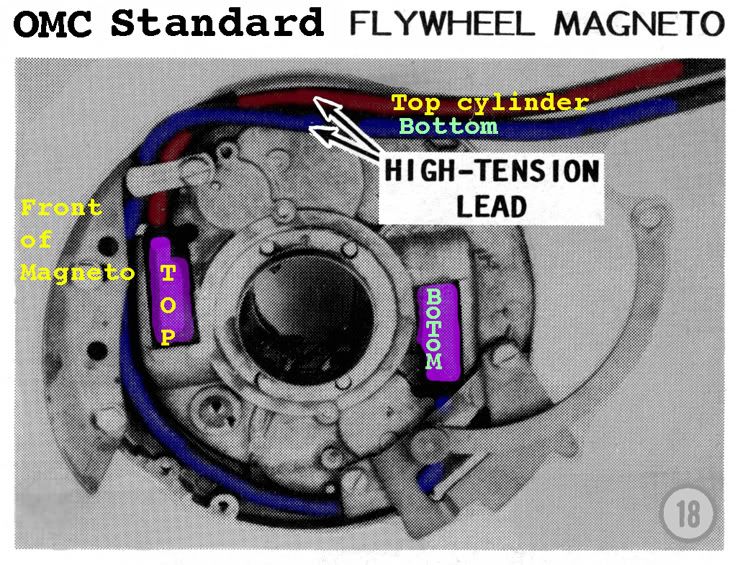
If your using the existing wires then cut about 1/4 inch of end going the coil, so you have clean un-oxidized copper contacting the spiking in the coil. Twist the end of the spark plug wire onto the coil spike. If you have replaced the wires, make sure they are 7mm copper metal core and not the automobile stuff.
***** Please make sure two things*****
1.) Make sure all the wires are tucked away under the flywheel and not rubbing up against the cam or crank, because with will eventually get damage and create a short, then no spark!! Be sure to reconnect the stop wires back on correctly.
2.) Make sure the coil heels (ends) are evenly lined up with the mounting boss.
Here are some pictures. (Compliments of JBJennings..nice fella)


Lining up the coil heel with the mounting boss prevent damage of the coils and the flywheel magnet, prevent rubbing as the flywheel turns.
I hope this helps ya out! Might have gone overboard a bit but wanted to make sure you had a good idea.
May 15, 2015 at 12:01 am #15994Jake11,
FrankR and Fleetwin are to 2 very knowledgable guys that know their stuff. We are fortunate to have a boat load of knowledgeable guys, I am just giving a compliment to the 2 current posters that responded to your post.
May 15, 2015 at 12:14 am #15995CajunCook1, great write up and thanks for all the info! I checked compression prior to purchase. I don’t remember exactly what the numbers were because I wasn’t sure what it should be so I just wanted to make sure they were close to even. I want to say with 4 pulls each cylinder it was around 110 on both. They were pretty darn close to being perfectly even to my surprise. I also checked spark with tester while I was there. I usually go between 1/4 and 1/2 inch somewhere and it had good spark. Not amazing but did get a good snap and blue spark. After I got home I pulled flywheel with puller just to see what everything looked like and the condensers and points appear to be new. The coils look older but good. Everything was gapped good so I just cleaned the points up a bit and put it back together. I did notice this plug wires had been replaced with what look like automotive wires so I guess I’ll have to change them back to originals. I mixed the gas a bit thicker than 24 to 1 because I had read it should be 16 to 1 and 24 to 1 so I wasn’t sure which to go with.
-
AuthorPosts


- You must be logged in to reply to this topic.