Here is the link to the company that I got them from years ago…
It appears they changed names but the part numbers are still good.
The link is one of the part numbers….
You can search their site for both numbers and find both internal as well as external plug housings.
https://us.rs-online.com/catalogsearch/result/?q=97-3102A20+8P
These are the 2 part numbers I have used in the past for the connectors.
If memory serves, they are the correct fittings for the 1956, Mk25E, MK30E and the Mk55E motors
Internal : 97-3102A20 8P
External: 97-3102A20-8S
As an addendum, here is a link to the conversation from many moons ago, on this site…
I just searched Amphenol connector, waded thru the posts and found my earlier post..
You can find the info here as well,
https://www.aomci.org/forums/topic/wiring-harness-broken-pin-mercury-mark-30e/
http://www.richardsoutboardtools.com
classicomctools@gmail.com
1 user thanked author for this post.
Beginning a new Merc project this winter.
It is an early 1956 Mark 55E, with the Amphenol connector. I’m wondering if I could convert that older style connector to the newer style, as seen on the Mark 58A/E.
If so, please let me know. I have found that the Amphenol connectors are very hard to find, and the harnesses are even more so.
Thank you,
Aidan
"Shells sink, dreams float. Life's good on our boat."
1949 Mercury KE-4
1952 Mercury KF-3,-5,-7
1952 Mercury KG-7Q
1937 Evinrude Scout
1938 Elto Pal
1946 Evinrude Ranger
Michel your not getting much help so far. I can tell you how to get the timing belt off a 56/57 Mark 55. First align the timing marks and take a picture or do some thing to help remember how they were aligned. Turn the motor over slowly the timing marks should be easy to see. Take the nut off the distributor pulley that the belt runs on. Take the nut off the flywheel and use a puller to get it loose. Lift the distributor pulley up and off to get some slack in the belt. The flywheel and belt should lift right off. When you put it back on it might take a couple tries to get the belt on the right cogs so the timing marks align.
Nothing is easy on a Mercury!
dale
Hello,
This is my first post as a new AOMCI member – I have 2, 1950 Mercury KG-7’s I’m restoring (and a Mark 55A for a future project)…. question:
What’s the best way to remove a) Part # 20599 the Magnet Rotor and b) Part # 28-20625 the Crankshaft Key?
I have the original flywheel puller and have removed the flywheel nut, and the scintilla stator plate – next up is the magnet rotor…..
Do you have to remove the key first or will the magnet rotor slide up over it, then you remove the crankshaft key?
I’m planning to build a jig that uses the original flywheel puller and grabs 2 pieces of steel wedged underneath the magnet rotor by bolts, such that when I turn the flywheel puller main screw, it’d pull the magnet rotor upwards. Is this a good idea? Any advice is greatly appreciated.
Tracy Maxwell
The Mercury Propeller Torque Adaptor Tool I want is C-91-24106. It is for the Mark 5, Mark 6, KF-7, and KF-3 models.
Mercury made a similar tool C-91-24272 that I DON’T need that was used on the KF-7 and KG-7 for torquing the clutch slipping and adjustment. I have one of those and don’t need it. It is the wrong one for my 1955 Mark 5.
Please let me know if you have a C-91-24106 for sale. I would be happy to trade for it if you need the other one.
I also would like to meet someone who knows how to properly USE the tool and talk to them. My email is racefan9@cfl.rr.com. contact me so we can exchange cell phone numbers.
John Timmins – DaytonaJohn, Florida Chapter
most condensers fail eventually can you do basic test…(short – open – capacity kick or measurements ) some mercs have tricky “insulating blocks” in the ignition system so check for airline cracks which could allow shorting out sparks
check spark wire continuity from plug boot back to ignition coil (s) see chatgpt info
Step-by-step servicing procedure
-
Access the magneto / points
-
Visual inspection
-
Look for oil/water contamination on the points or condenser, cracked insulation on HT wires, corroded connections, or arcing marks. If the points heel (the fiber pad) is badly worn or the faces are pitted/blue, replace the points. maxrules.com
-
Clean or replace points
-
If only lightly dirty, clean the contact faces with a points file or fine emery, then wipe with contact cleaner. If pitted or rough, fit a new points set. Setting the gap is critical (see step 5). MarineEngine
-
Replace condenser (capacitor)
-
Set the points gap (pre-timing)
-
Typical magneto/points guidance for vintage outboards: about 0.012″–0.018″ (0.30–0.45 mm) is commonly used. Many restorers set ~0.015″ (≈0.38 mm) as a safe target, then fine-tune timing. Small changes in gap change ignition timing — set the gap first, then time the magneto. Use a feeler gauge at the maximum cam lift (follow the manufacturer method if you have the manual). themagnetoguys.co.uk+1
-
Lubricate the cam / pivot
-
Check coils and wiring
-
Timing
-
With the points gap set, reinstall flywheel enough to rotate by hand and observe when the points open (or use a strobe/timing light on running motor if possible). Many vintage Mercury setups require firing roughly at a point before TDC — manuals/forum threads explain the exact advance angle for each model. If you don’t have a timing mark, set the gap with the cam high-point method then fine-tune on the test tank. aomci.org+1
-
Test firing
-
Reconnect HT leads (or reinstall plugs), turn the engine over by hand to confirm sparks at each plug (use a plug removed and grounded safely to check spark visually), then run on a test tank with proper choke/throttle adjustments to check idle and advance behavior.
-
If things still misbehave
-
Common causes after a points/condenser service: wrong gap, weak condenser, cracked coil insulation, magneto assembly seating (flywheel key/fit), or advance mechanism mis-set. Forum rebuild threads and magneto-specialist videos walk through diagnostics—mail-in magneto rebuilders exist if internal coil or cam ring work is needed. aomci.org+1
<hr data-start=”4953″ data-end=”4956″ />
Replacement parts & repair services
-
Where to buy parts: OldMercs, MarineEngine parts listings, eBay listings for vintage points/condensers. Match by model/serial if possible. oldmercs.com+2MarineEngine+2
-
Magneto rebuild shops / specialists: Many restorers refer to small specialists (mail-in) or local antique outboard shops — forum threads list names and experiences. If coils are bad, specialist rewind/repair is usually required. aomci.org+1
<hr data-start=”5459″ data-end=”5462″ />
Quick troubleshooting checklist
-
No spark at all: check condenser first, then coil continuity, then points opening.
-
Weak, intermittent spark: dirty points, leaky condenser, cracked HT lead.
-
Timing oddities after changing points: re-check gap and re-set magneto position; small gap changes = a few degrees of timing shift. Smokstak+1
Joining AOMCI has priviledges 🙂
What kind of grease should I be using on the shift cam on 1956 mark 55? It takes a lot of muscle to get’er into reverse. I been using regular marine grease. Once it’s in gear it works like it should. Gear oil is OK. Maybe it needs lubraplate?
dale
get’em wet….don’t let’em set
Replies viewable by members only
1 user thanked author for this post.
Hello,
I finally am getting around to restoring my lapstrake boat and outboard. I have a Mercury Mark 25E. Here is a photo of the coils:
Here is a close-up of one of the coils:
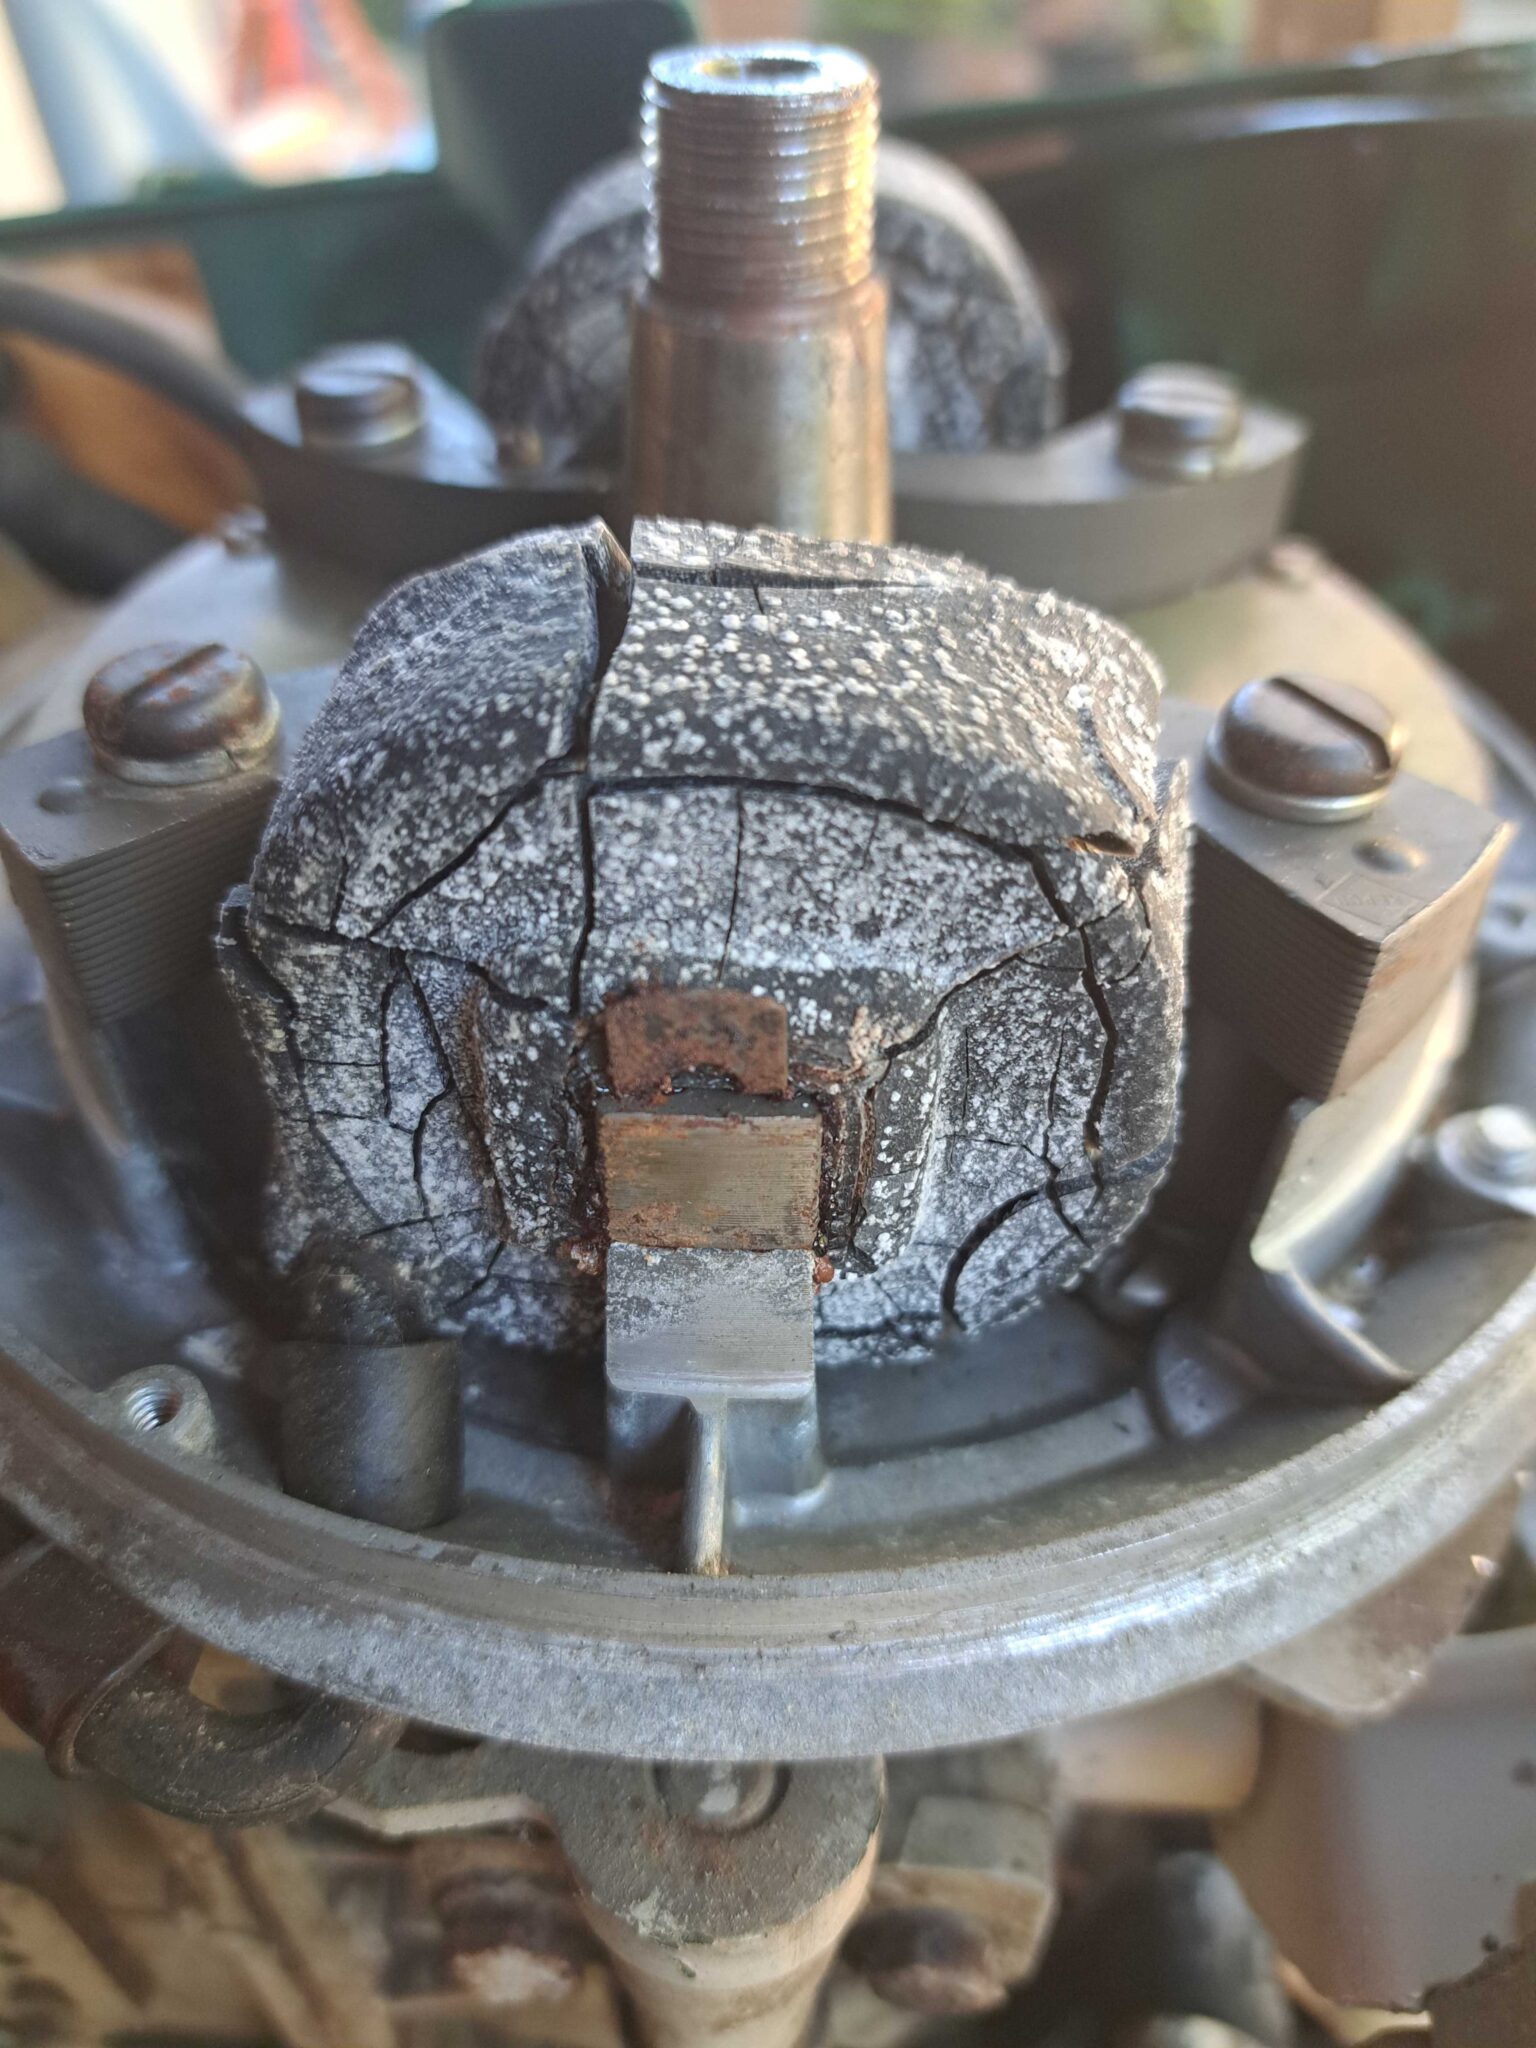
My question is, does anyone have a line on replacement coils? Please let me know.
Russell
Interesting thread. I noted olcah comment about the 1954 model electric start powerhead having a different casting, i.e., threaded studs, to allow for the starter bracket. I had a similar experience with what I thought would be an easy electric start conversion with a Mercury Mark 25, I went into that project with my eyes wide shut! The 2 years, 1955, 1956, Mercury produced that electric start model it also had a dedicated powerhead with 4 threaded studs to allow for the starter bracket. For kicks and giggles I have considered drilling and tapping the 4 studs in a standard Mercury Mark 25 powerhead for an electric start conversion. I love the convenience of electric starting. I’ve done several 1957/1958 J/E 18hp conversions and they couldn’t be easier. It was interesting reading today about the early, (1954), OMC history of electric starting.