Home › Forum › Ask A Member › 55 RDE-17, 25 hp, Power Head O-rings, etc
- This topic has 54 replies, 12 voices, and was last updated 5 years, 9 months ago by
 outboardnut.
-
AuthorPosts
-
July 9, 2018 at 12:13 pm #79263
Thanks Mumbles. The next garage sale of flea market I’ll
be looking for some sacrificial extensions, but can
probably spare one in the mean time if necessary!Prepare to be boarded!
July 9, 2018 at 3:09 pm #79269OK, just reading this post…
That powerhead looks great, nice job cleaning it up, no need to repaint it…Looks like you have already prepped the pans for paint.
Beautiful job cleaning up that mag plate…I’m guessing this engine is one of the ones with the crazy recirc system that is designed to pull excess oil down to the intake from that upper bearing, which is why there is no oring between the upper bearing and the crankcase. Please inspect this system carefully, you sure don’t want oil sprayed on that nice mag plate.
Pulling the powerhead was a great idea to inspect the lower carbon seal and replace the oring, be sure to clean those crank/driveshaft splines before coating the driveshaft splines with moly lube just prior to reassembly. With the powerhead off, you can sneak a peek up into the exhaust ports to get a look at the piston skirts and rings. I’m guessing the powerhead is OK, the readings are a little low probably just because you couldn’t get the flywheel rotating fast enough using the rope notches in the flywheel. If you are still in doubt, then go ahead and pull the head to have a better look.
Have you drained the lower unit lube yet? I would do that before doing the impeller to see whether or not you will have to reseal the gearcase, inspect the clutch dog/gear lugs. Be careful using the heat around that lower clamshell, you might burn up the lower mounts, keep an extinguisher handy. But, wasting the mounts is better than shearing off a bolt in the exhaust housing.
Finally, looks like those mercury switches have been messed with, so that system will have to be inspected. I have often wondered if there is a way to "upgrade" the older mercury switch systems to the set up on the newer engines that don’t using those pesky mercury switches….
I love the 55 Johnson colors and graphics, this engine is surely worth the investment in time to bring her back. I feel that oftentimes a less than perfect original paint job looks much better (with a little cleaner/wax) than a respray, not much can match the original factory paint. Sure, we have seen some outstanding refinish/repaint jobs that are much better than the original paint, but that surely required a big investment in time and the knowledge it takes to do a paint job that will last.
I know you will be happy with this engine, we can’t wait to see/hear her alive again…July 9, 2018 at 5:03 pm #79274Fleetwin, thanks for your input and good suggestions.
The lower unit and steering bracket are now apart.
I did not open the gear case yet, but sure I will.
I laid the whole works on the work bench. That,
and a new day, helped considerably. There was a
access hole on the bottom side where one could
see the long bolts on the clam shell. Did have to
use the torch up that hole get get one bolt loose.
Impact driver bits were too short, but by having
the l.u. on the work bench, I was able to "do my thing"
with a big screw driver with a vise grip for leverage,
hammer, WD-40, and the torch on two bolts.The lower unit was repainted at one time, and it’s a different
shade than the rest. Perhaps the original color just faded,
but I’ll probably repaint the whole thing.
The motor hood, is weathered, and no doubt the motor
sat on a boat outside for years. I haven’t tried cleaning it
up yet, but if possible, I’ll keep it original.I will pull the port covers to take a peak at the piston and rings.
Did these 1950’s 25 hp motors have any issues with wrist pins
like the 10 hp ones of the same vintage?
I did the "wrist pin test", but was inconclusive. I thought
a couple of times I heard a little "click", but no big "CLUNK"
like on the 10 hp Sportsman!This unit has the single mercury switch, which had the wire
broken off. The switch itself was okay, so I cleaned up the
post on the switch, laid the end of a new wire beside the
post, and used about 6" inches of copper wire to bind
the two together, then coated it with liquid rubber.
I hope someone comes up with a good mercury switch
replacement as well. I did see some cheap Chinese ones
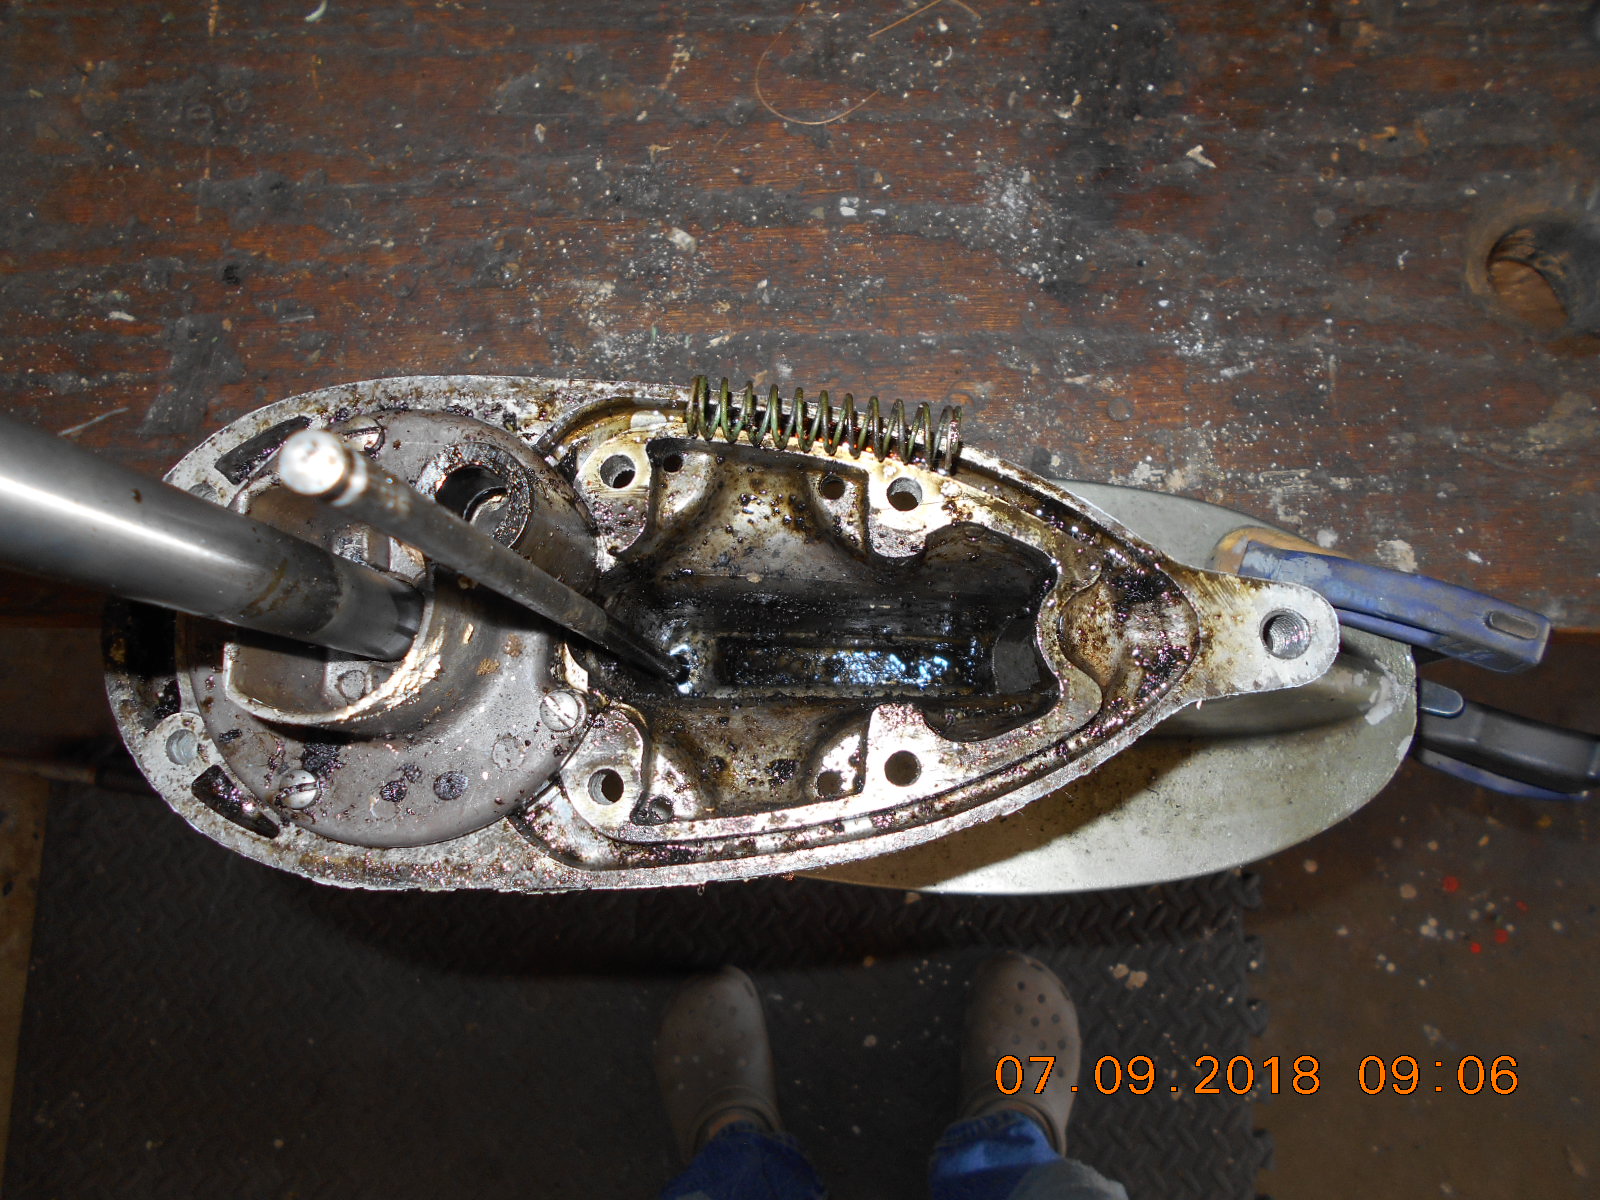
for sale, but not sure if they’d work for the application.Regarding the photo, I found this spring laying loose
in the bottom of the L.U. exhaust cavity.
Only springs that look similar I noticed were either
from the "twist grip" spring (I have no tiller) or
the shifting lock spring. Not sure how it ended up
were I found it at any case!Thanks!
quote fleetwin:OK, just reading this post…
That powerhead looks great, nice job cleaning it up, no need to repaint it…Looks like you have already prepped the pans for paint.
Beautiful job cleaning up that mag plate…I’m guessing this engine is one of the ones with the crazy recirc system that is designed to pull excess oil down to the intake from that upper bearing, which is why there is no oring between the upper bearing and the crankcase. Please inspect this system carefully, you sure don’t want oil sprayed on that nice mag plate.
Pulling the powerhead was a great idea to inspect the lower carbon seal and replace the oring, be sure to clean those crank/driveshaft splines before coating the driveshaft splines with moly lube just prior to reassembly. With the powerhead off, you can sneak a peek up into the exhaust ports to get a look at the piston skirts and rings. I’m guessing the powerhead is OK, the readings are a little low probably just because you couldn’t get the flywheel rotating fast enough using the rope notches in the flywheel. If you are still in doubt, then go ahead and pull the head to have a better look.
Have you drained the lower unit lube yet? I would do that before doing the impeller to see whether or not you will have to reseal the gearcase, inspect the clutch dog/gear lugs. Be careful using the heat around that lower clamshell, you might burn up the lower mounts, keep an extinguisher handy. But, wasting the mounts is better than shearing off a bolt in the exhaust housing.
Finally, looks like those mercury switches have been messed with, so that system will have to be inspected. I have often wondered if there is a way to “upgrade” the older mercury switch systems to the set up on the newer engines that don’t using those pesky mercury switches….
I love the 55 Johnson colors and graphics, this engine is surely worth the investment in time to bring her back. I feel that oftentimes a less than perfect original paint job looks much better (with a little cleaner/wax) than a respray, not much can match the original factory paint. Sure, we have seen some outstanding refinish/repaint jobs that are much better than the original paint, but that surely required a big investment in time and the knowledge it takes to do a paint job that will last.
I know you will be happy with this engine, we can’t wait to see/hear her alive again…
Attachments:

Prepare to be boarded!
July 9, 2018 at 5:05 pm #79275That sure does look like the shift lock spring, especially with the green paint….
http://www.richardsoutboardtools.com
classicomctools@gmail.comJuly 9, 2018 at 5:33 pm #79278Yes, sure looks like the shift interlock spring to me also…
And yeah, that midsection does look like it was repainted..
I wouldn’t take the gearcase apart unless there is evidence of water inside. Yes, I realize that you can not evaluate the clutch dog/gear lugs without disassembly, but I would take my chances….Sealing these units up properly is not as easy as everyone seems to believe.
Yes, pulling the intake covers is less invasive than pulling the head, less time and money spent as well. I would not pull off that exhaust cover, but attempt to retorque the cover bolts though…
I wouldn’t worry about the 25hp wrist pins, never heard any complaints about wear on these engines…
As a matter of fact, when it comes to the 10hps, seems like I have only heard/seen complaints on the 58-59 models, even though older models used the same components. Often wondered if the newer 10hps that used the smaller flywheel/gearcase spun up higher RPMs that triggered the sloppy wrist pin issues…July 9, 2018 at 5:54 pm #79279The 25hp has bronze bushings in the small end of the con rods. They eventually did wear, but if it passed the "clunk" test, don’t worry about them. Heck, be glad it doesn’t have the first attempt at needle bearing wrist pins, that fell apart.
BTW, most of the wear in the 10hp was the wrist pin bore in the pistons. On the 25 most of the wear was in the rod bushing. In the case of the 10hp, extreme wear in the piston let the wrist pin fall out.
July 9, 2018 at 9:15 pm #79284Glad to hear about the wrist pin slop not being a big issue on these 25 hp motors.
Hope I don’t have to pull the head. I broke 5 head bolts on a QD-10 I worked
on a couple of years ago.
Wish that loose spring could tell the story on "how" it got down that hole, lol.
I’ll have to compare it to the current on that was on the shift lock.
I’ll at least see if the lower unit has oil in in, if so, there has been no leaks,
so that’s a good start.
I’ve never done an actual pressure or vacuum test on a lower unit, as I
don’t have the equipment. Can a person rig up a bicycle pump and
slightly pressurize the lower unit, while it’s in a bucket of water
to check for leaks?Prepare to be boarded!
July 9, 2018 at 10:02 pm #79285I would hate to embarrass myself by showing a picture of what I cobbled together for my pressure tester, and it works with a bicycle pump..
Think short 3 inch piece of black pipe, with Schroeder valve threaded into one end and a piece of hollow brass plug with a steep for an o-ring and threaded 3/8-16 threads to go into the gear case.
Then bought a 15 psi MAX air pressure gage and threaded it in the middle of the pipe..http://www.richardsoutboardtools.com
classicomctools@gmail.comJuly 9, 2018 at 10:19 pm #79286Sounds simple enough, and only be ashamed if you used "duct tape", lol.
I think I can rig something like that up, except I haven’t seen
my bicycle pump in years….. hmmmmmm.Prepare to be boarded!
July 9, 2018 at 10:42 pm #79288Oh and it is sealed with JB Weld…LOL
http://www.richardsoutboardtools.com
classicomctools@gmail.com -
AuthorPosts
- You must be logged in to reply to this topic.